Students
TopStudents Module Deep Guide
This document is the detailed operational guide for the Student module. It follows the real tutor workflow from roster -> student detail -> lesson planning -> practice link -> review queue.
Route Map
- Roster:
/students - Student detail:
/students/{studentId} - Scope & Sequence:
/students/{studentId}/scope - Session logging:
/students/{studentId}/session - Practice review queue:
/students/{studentId}/practice - Public student practice link:
/practice/{token}
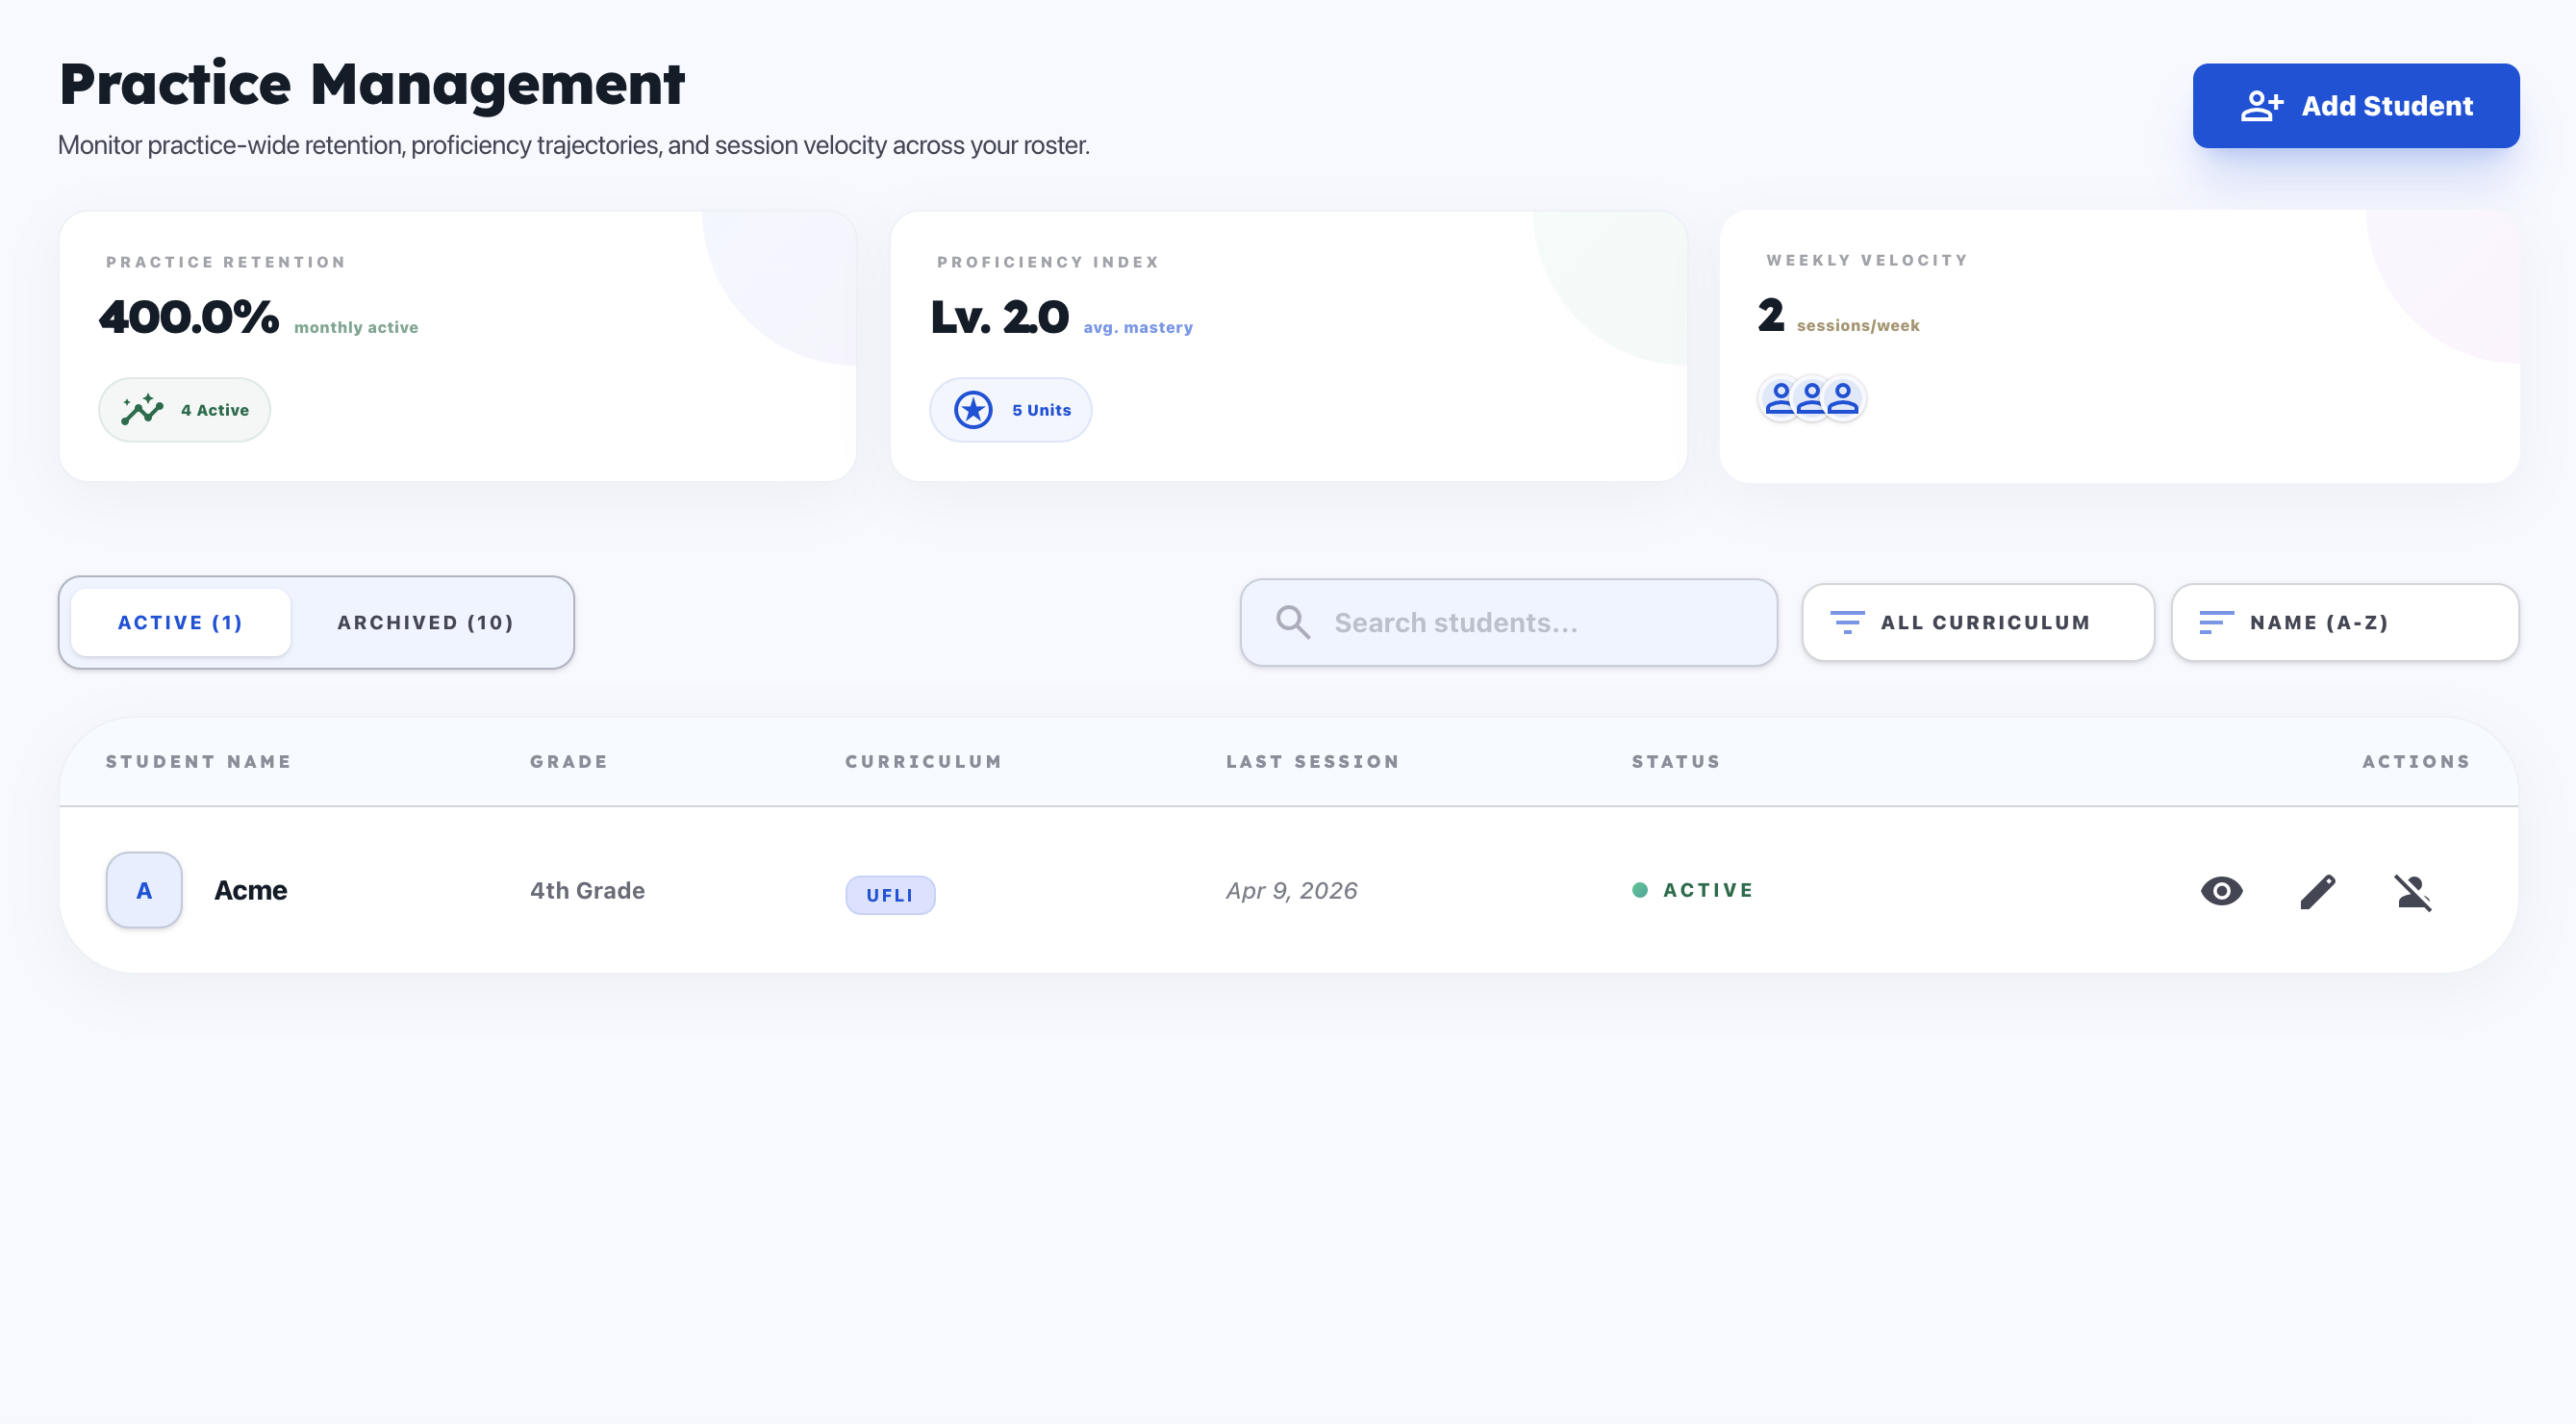
1. Open Student Detail from Roster
What this feature does
- Finds the correct student quickly.
- Filters the roster before entering profile-level work.
How it works on the UI
Entry Point
- Open
Studentsfrom the left sidebar.
Steps
- Use
ActiveorArchivedtab based on roster state. - Use search to narrow by student name.
- Use curriculum filter to narrow by program.
- Use sort to prioritize view (
Name,Date Joined,Recent Session). - Click the student row to open
/students/{studentId}.
Result
- You land on Student Detail, ready for planning, session logging, notes, and review.
UI illustrations
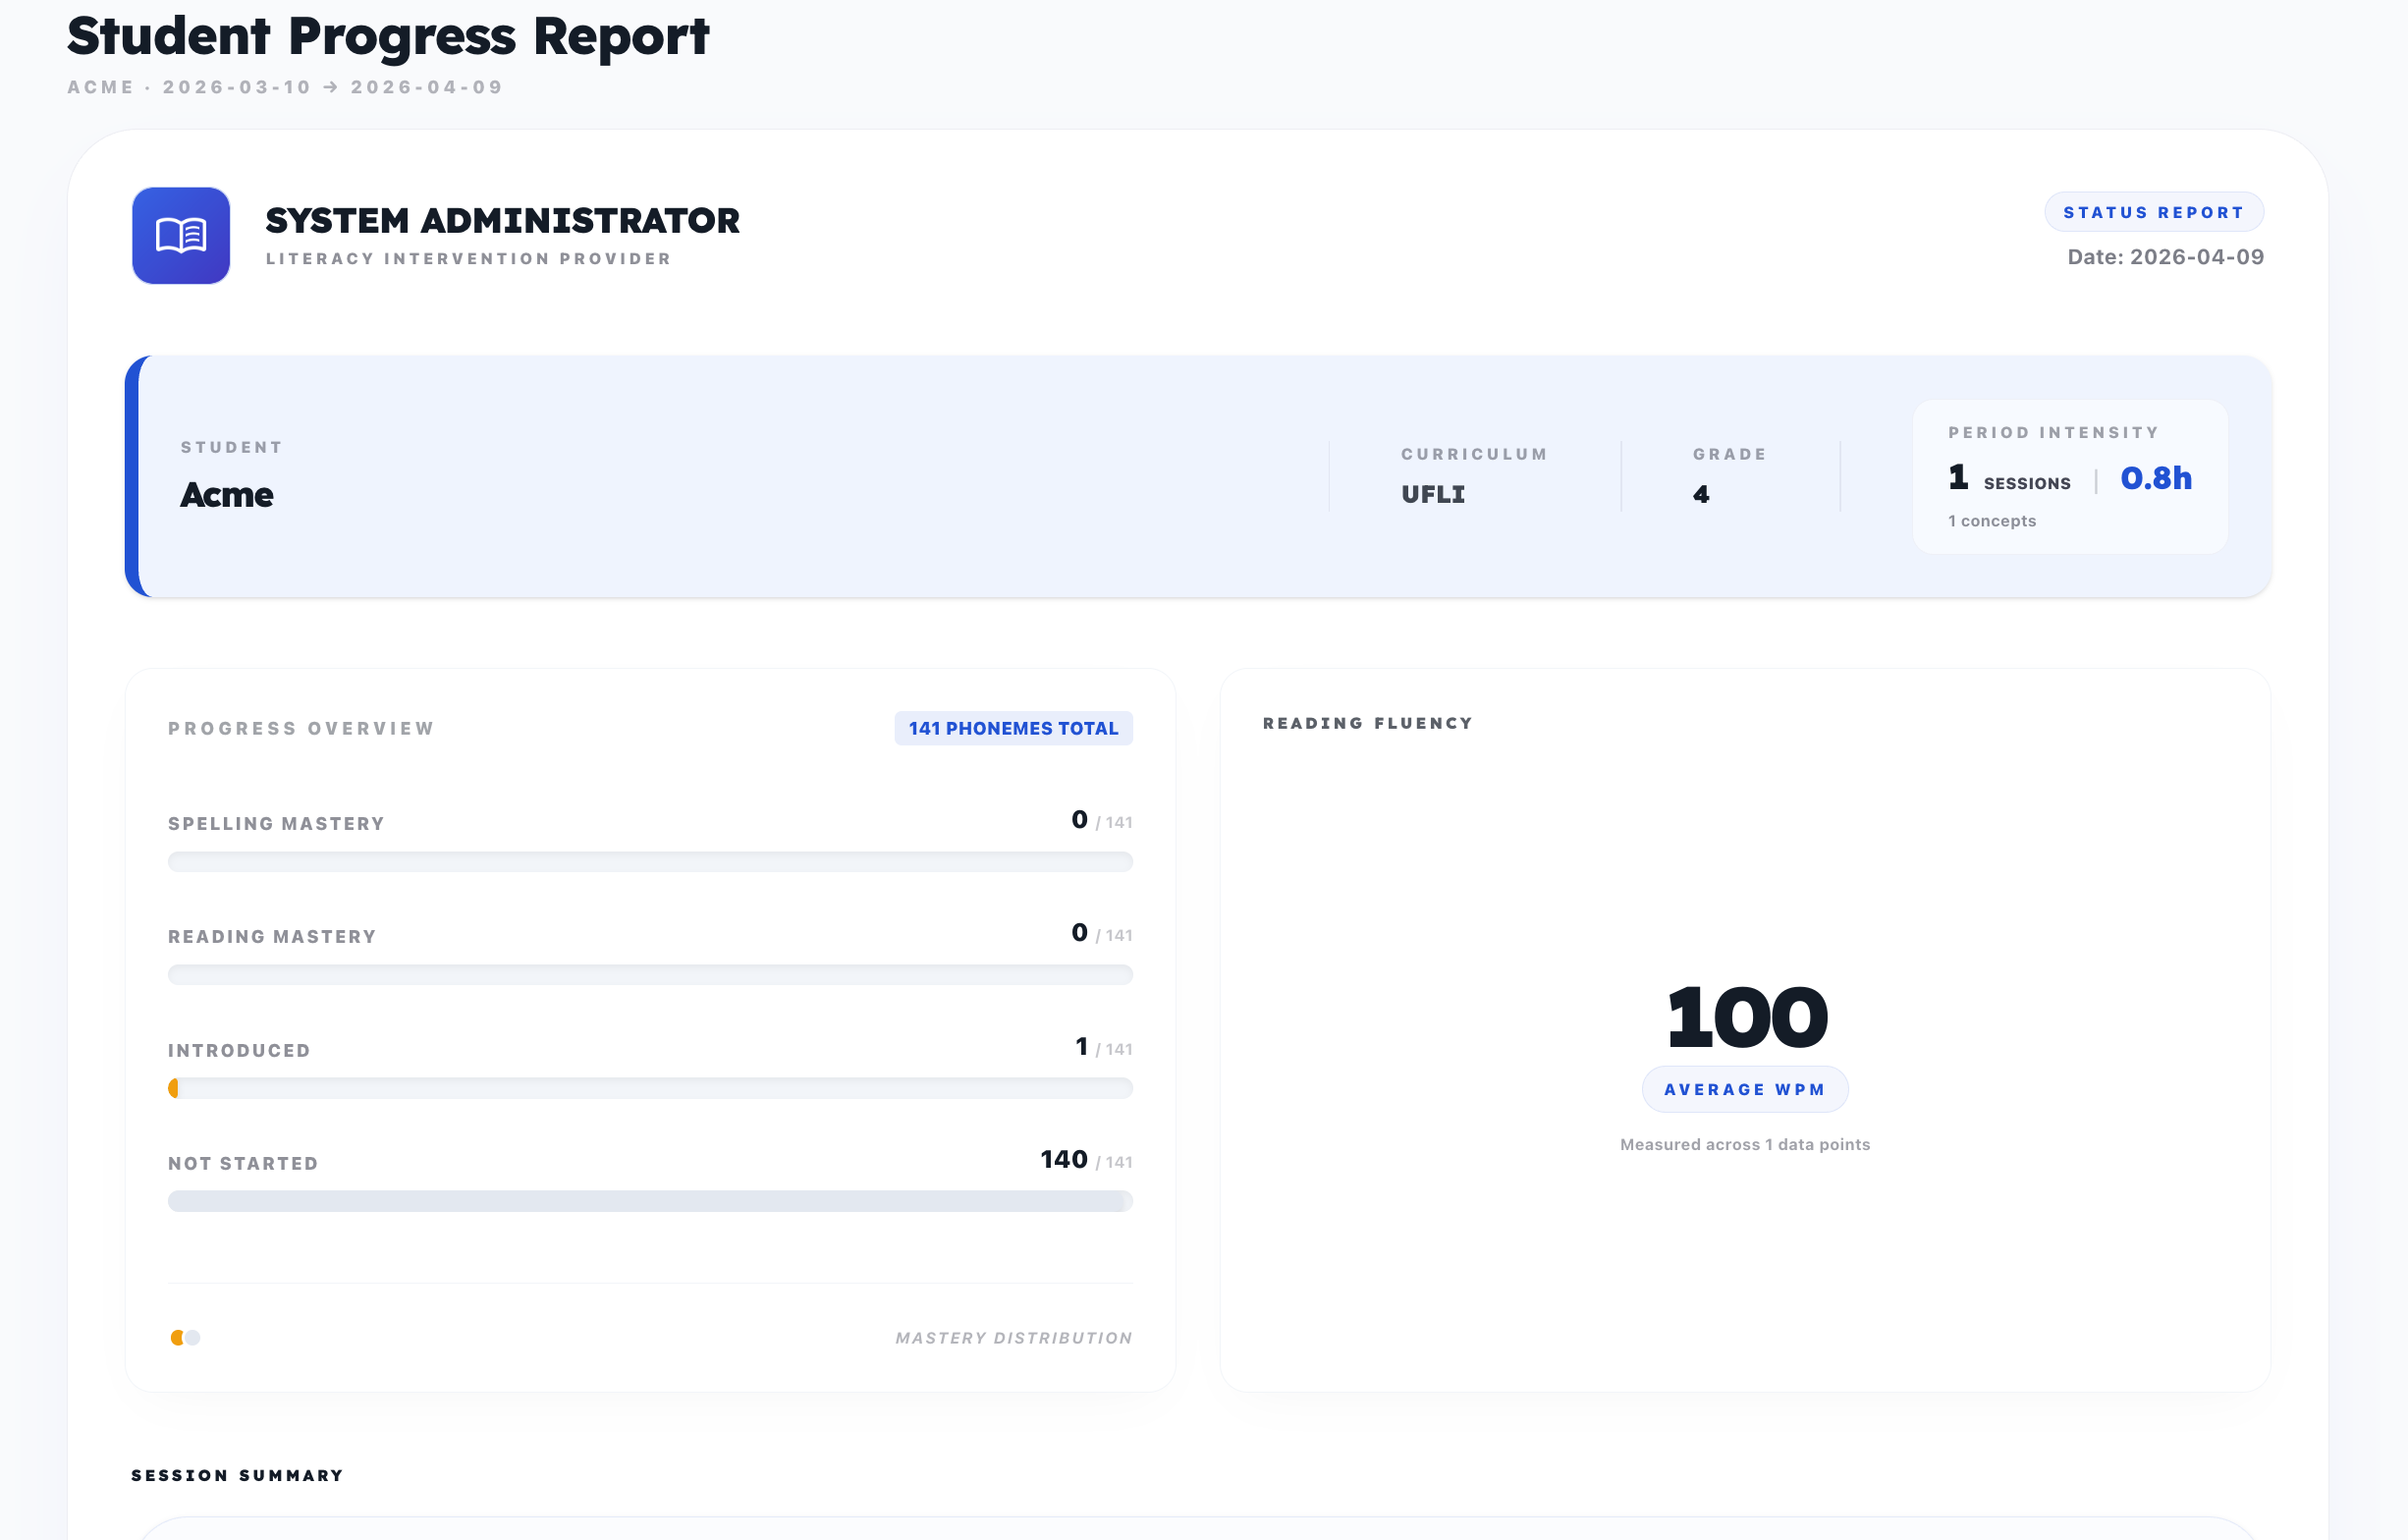
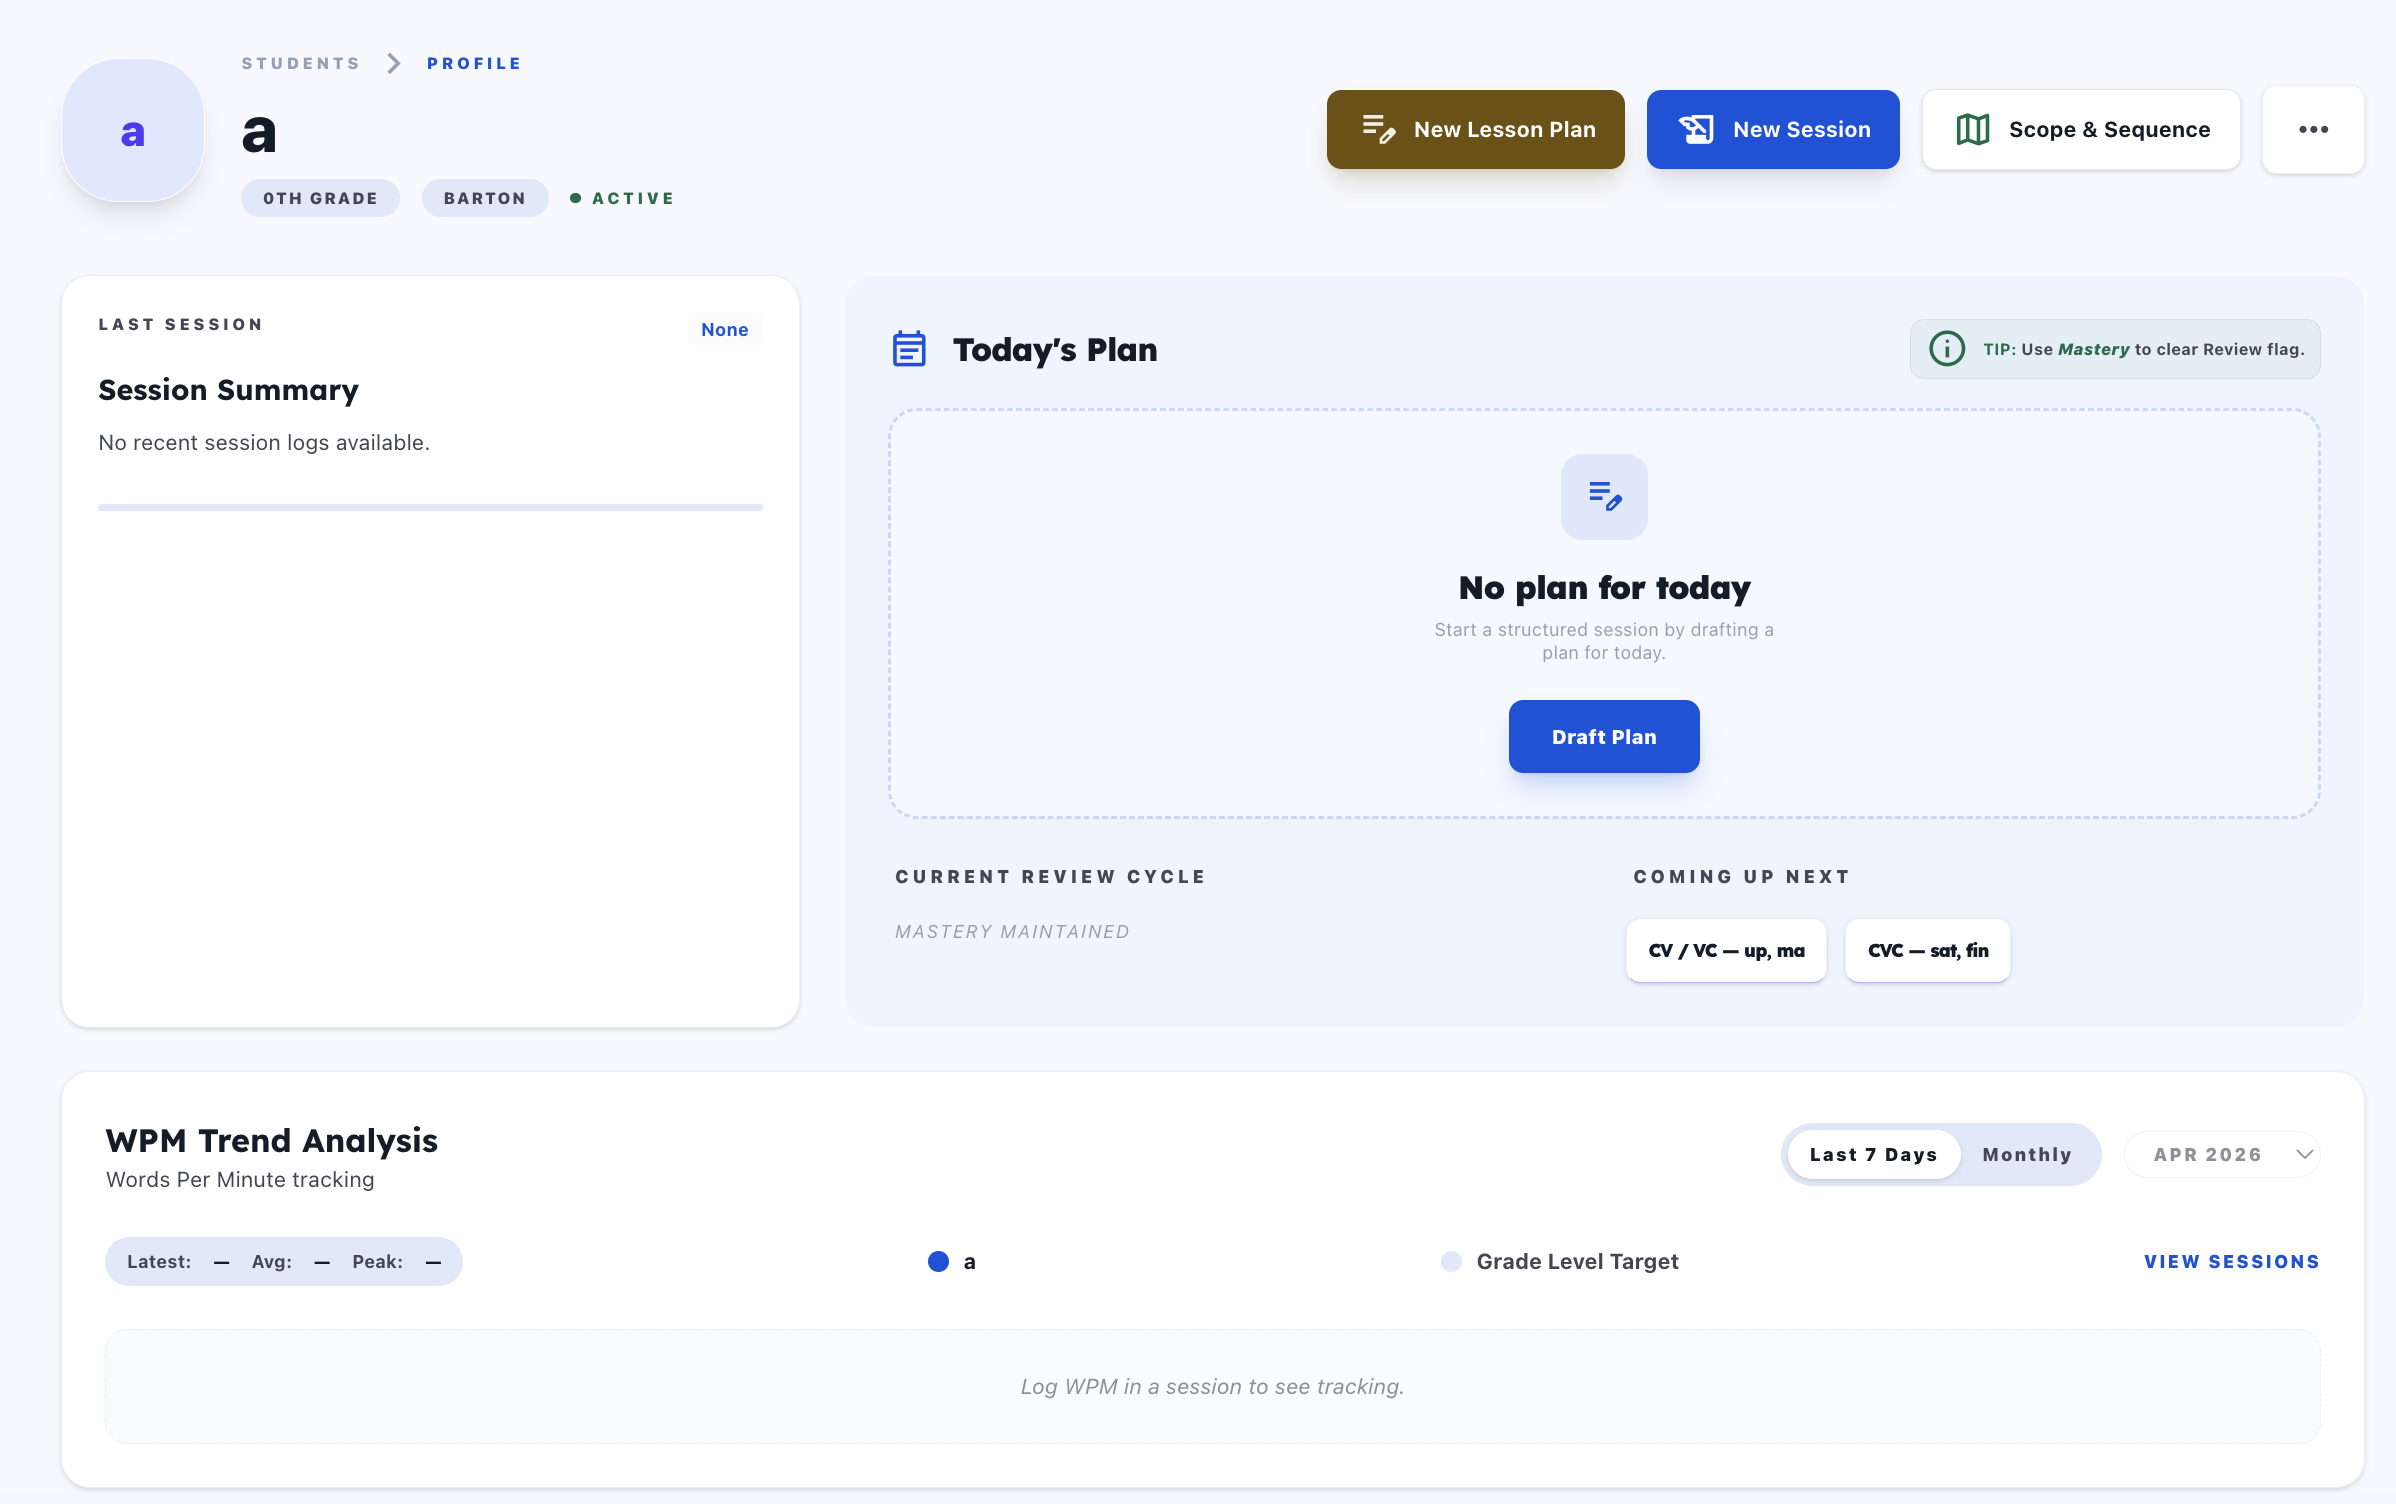
2. Understand Student Detail Layout
What this feature does
- Provides one central operating page per student.
- Exposes top actions and progress blocks for daily teaching decisions.
How it works on the UI
Entry Point
- Open a student row from
/students.
Steps
- Use the top action cluster:
New Lesson PlanorPlan (Clone Last),New SessionorAdd Session,Scope & Sequence, and...for notes/actions. - Read quick status blocks: Last Session summary, Today's Plan, Current Review Cycle, and Coming Up Next.
- Use lower sections for ongoing operations: WPM Trend Analysis, Session Timeline, Lesson Plan History, and Practice Queue.
Result
- Student Detail becomes the daily control center for instruction and follow-up.
UI illustrations

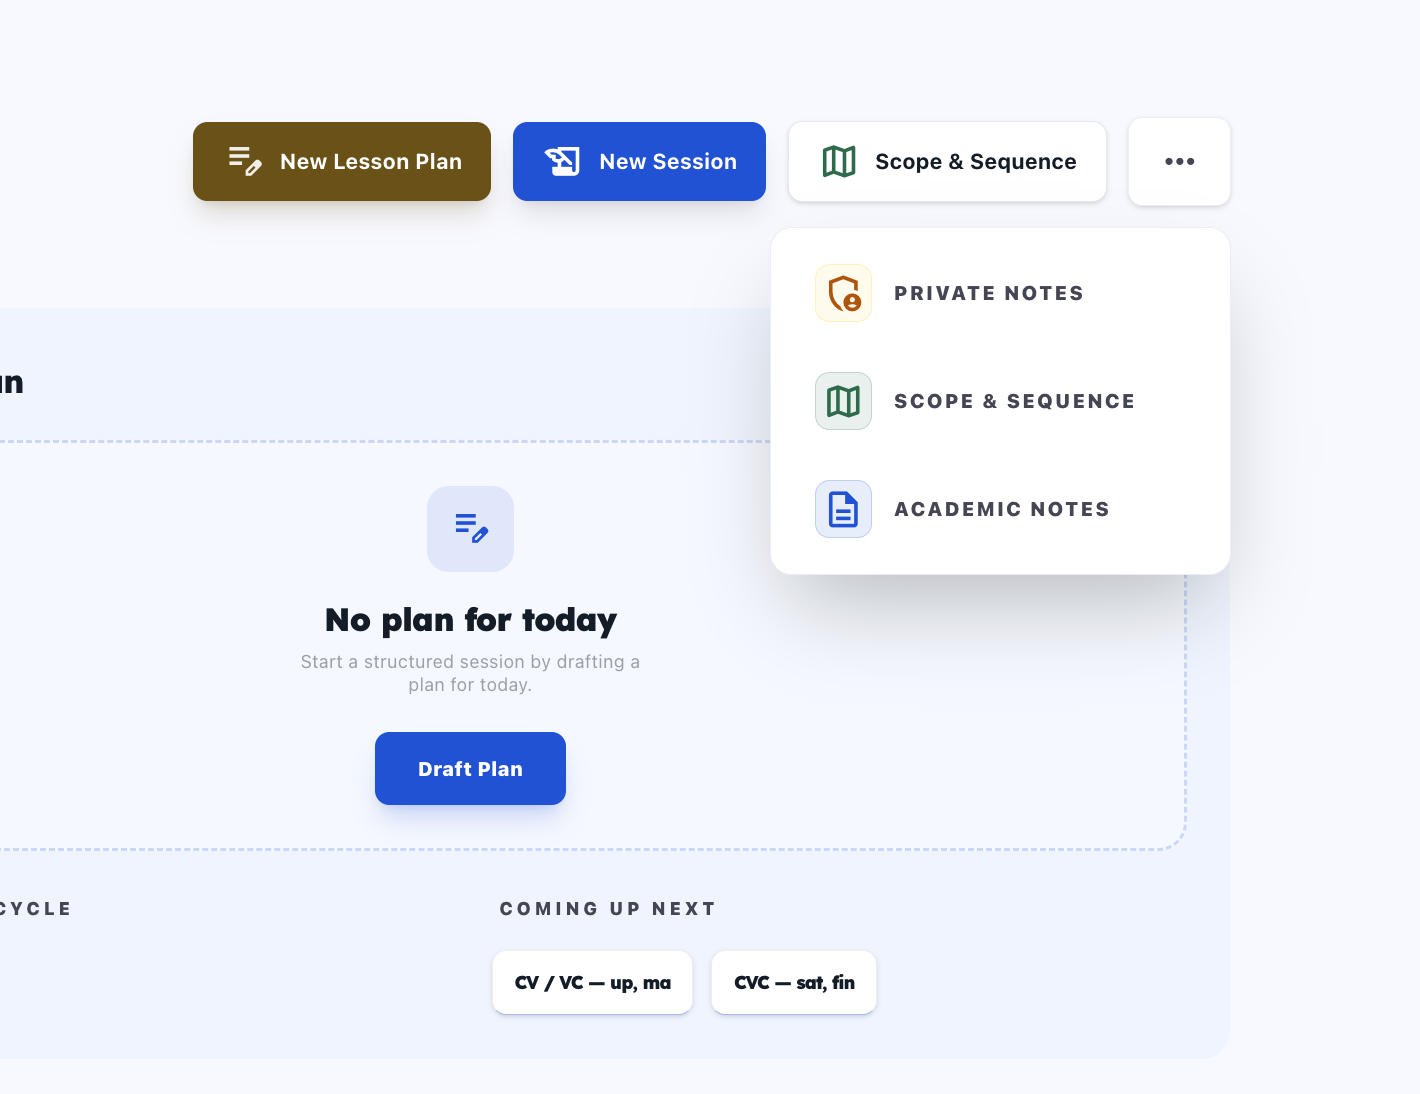
3. Manage Student Notes
What this feature does
- Separates internal tutor context from report-facing academic notes.
How it works on the UI
Entry Point
- On Student Detail header, click
....
Steps
- Choose
Private Notesfor tutor-only operational context. - Choose
Academic Notesfor instructional/report-ready narrative. - Edit inside modal and click save.
- Close modal and continue on Student Detail.
Result
- Notes stay attached to the same student and are available in future planning/reports.
UI illustration
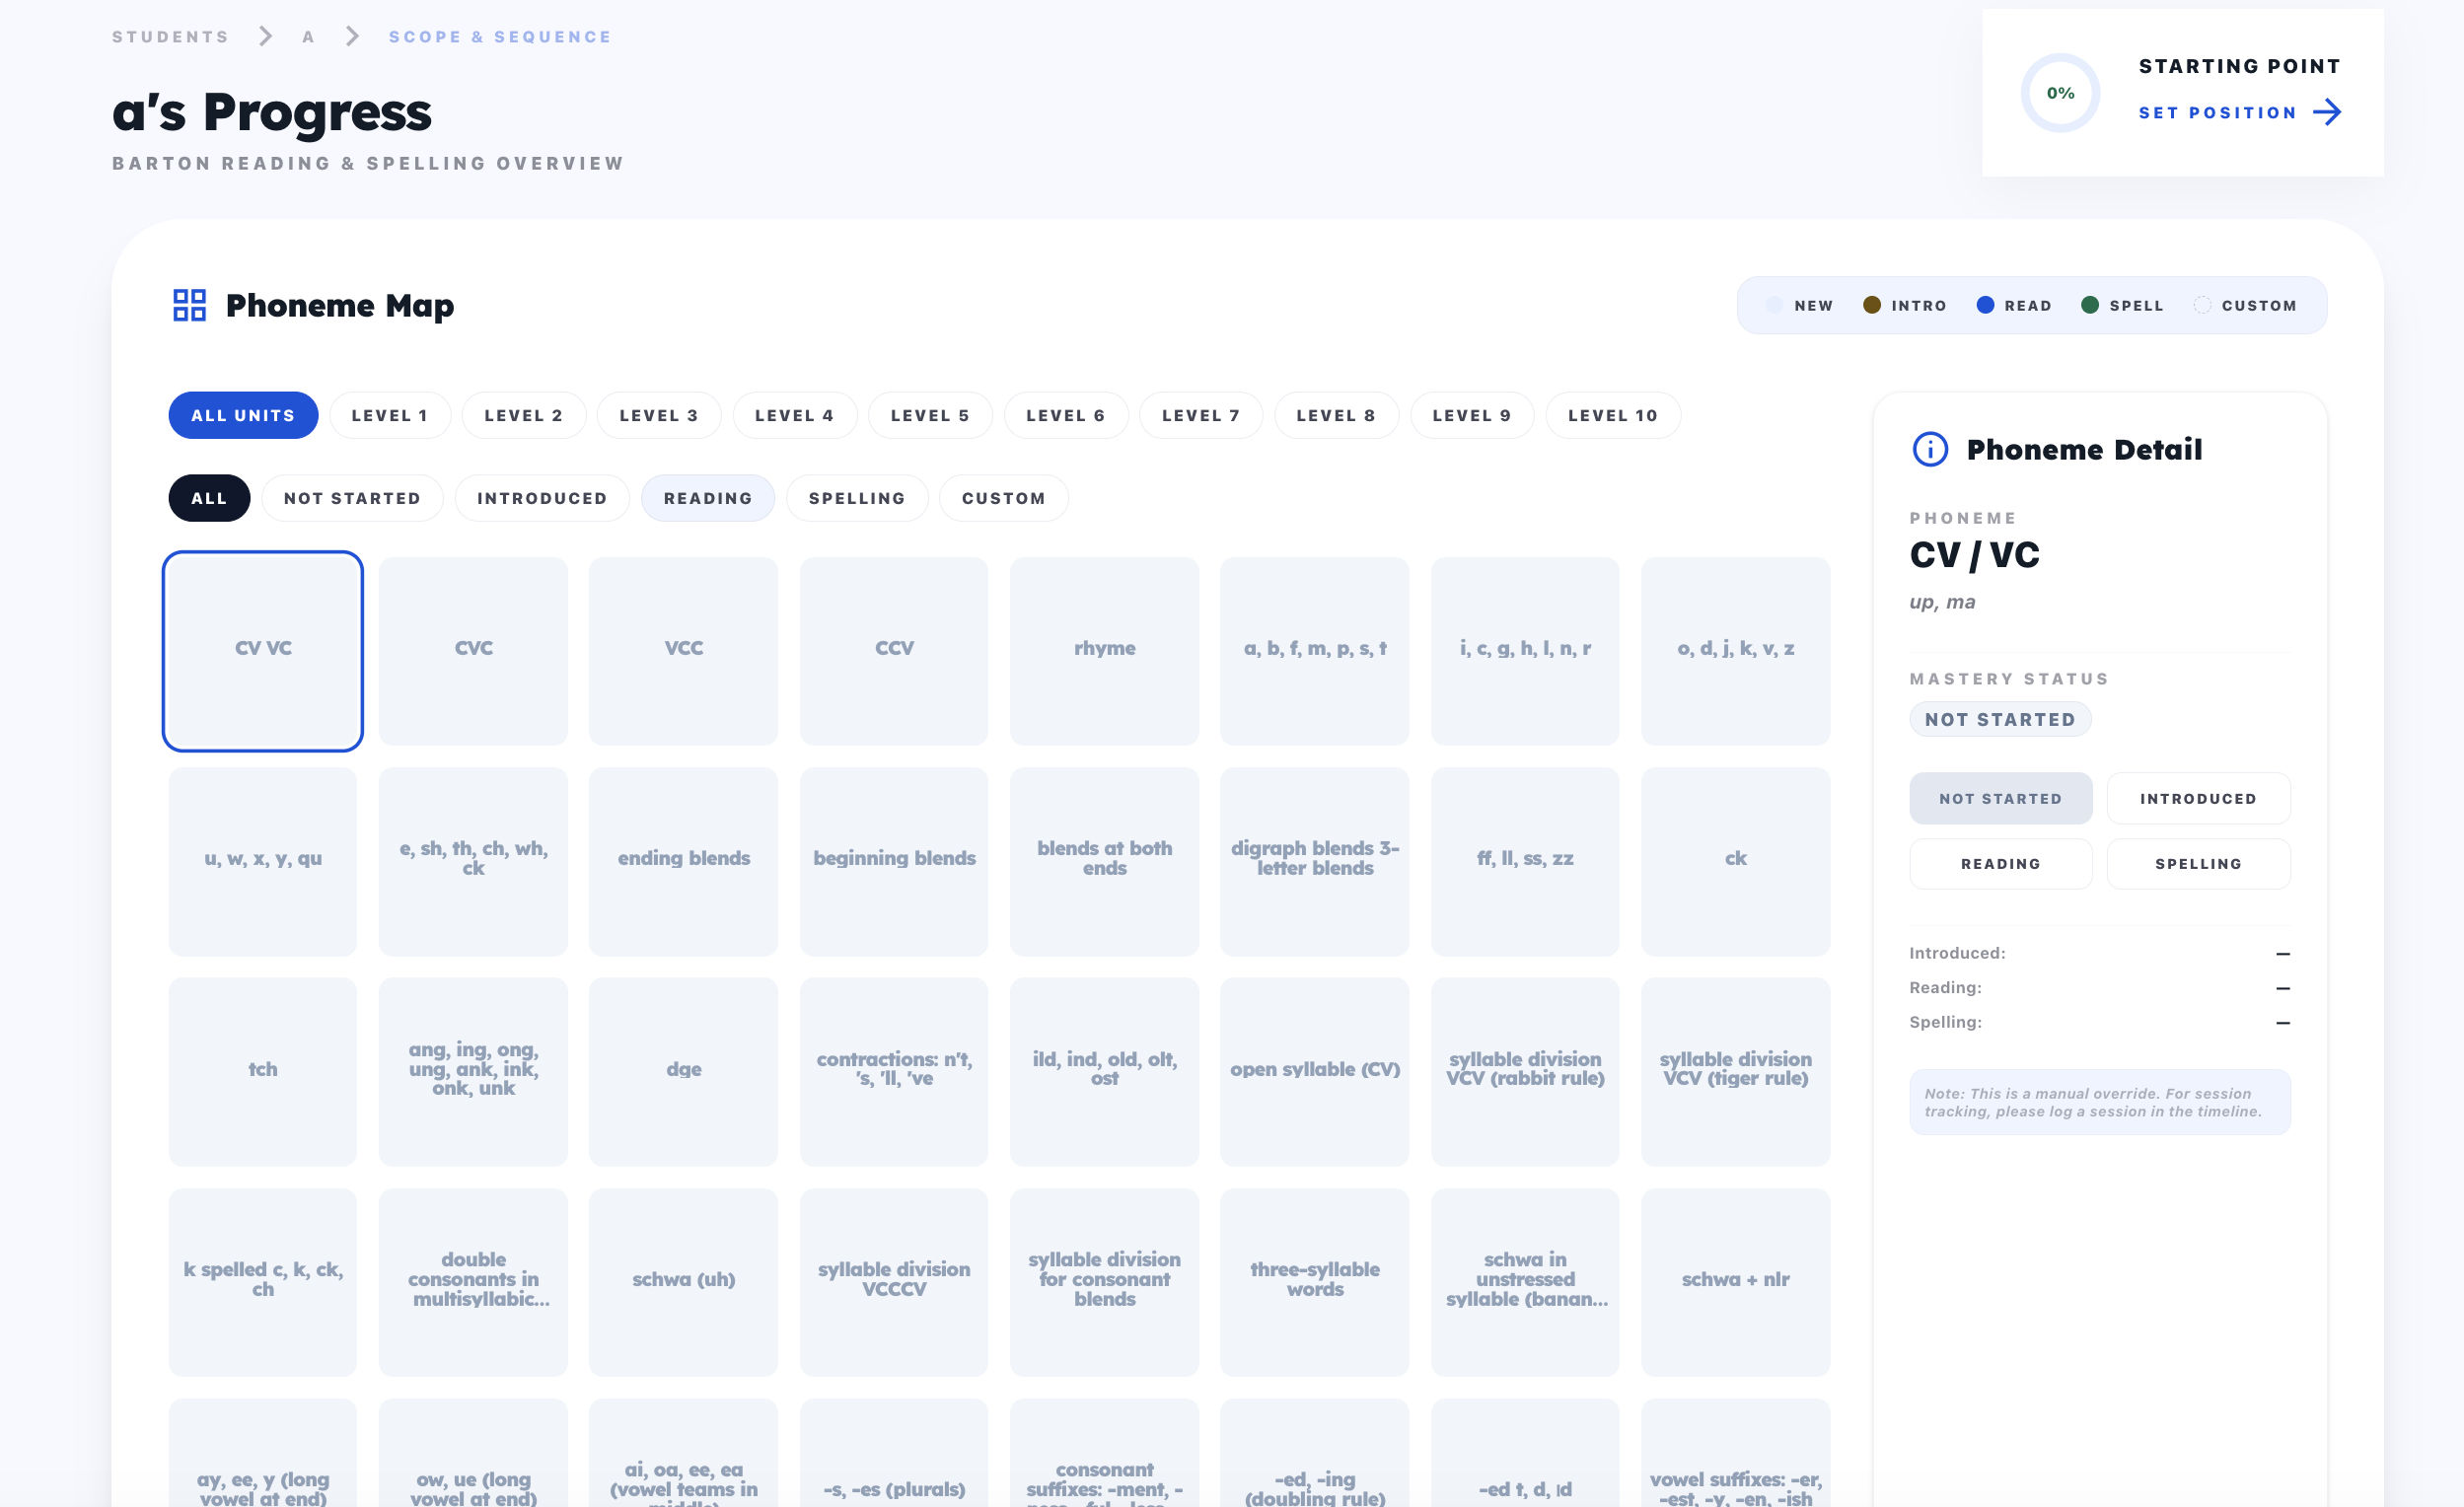
4. Use Scope and Sequence
What this feature does
- Tracks mastery state and progression targets.
- Feeds planning decisions with current status.
How it works on the UI
Entry Point
- Click
Scope & Sequencefrom Student Detail header.
Steps
- Review current statuses per target.
- Update progression states where needed.
- Return to Student Detail to continue planning/session work.
Result
- Updated scope state is reflected in planning context and student progression signals.
UI illustration
5. Log Sessions and Review Timeline
What this feature does
- Records session outcomes and preserves a chronological history.
- Supports post-session inspection and editing from timeline details.
How it works on the UI
Entry Point
- Use
New Session/Add Sessionon Student Detail, or start from a plan action.
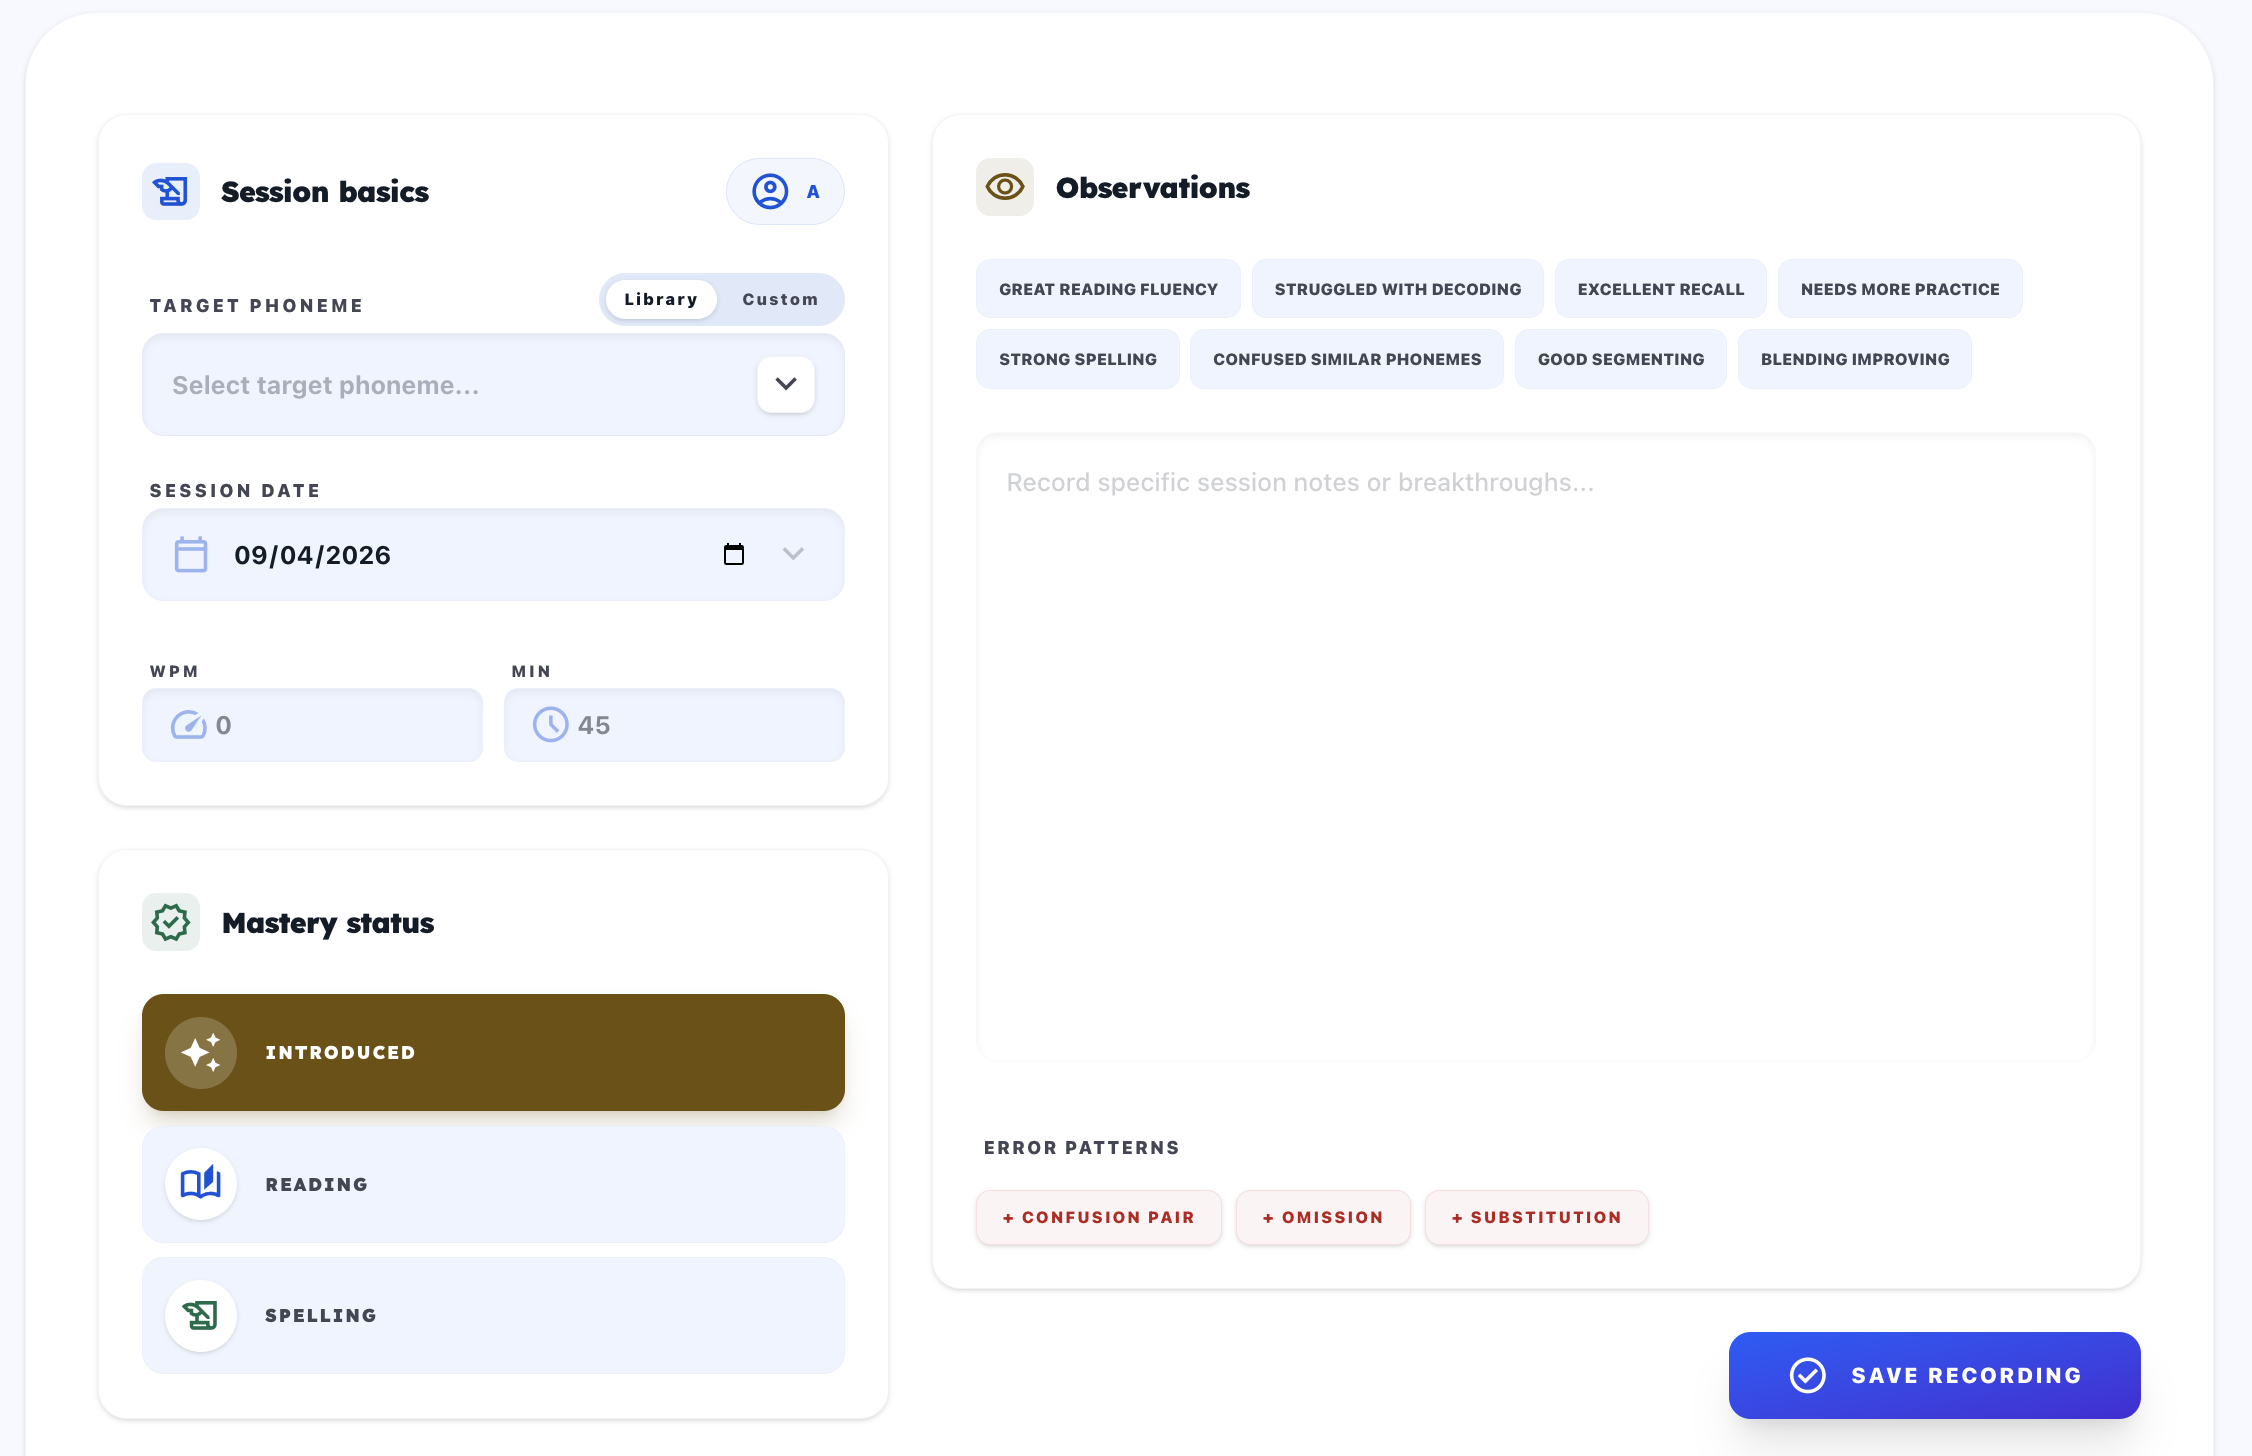
Steps
- Log target, mastery after-session state, note, WPM, and duration.
- Save session to add it into timeline history.
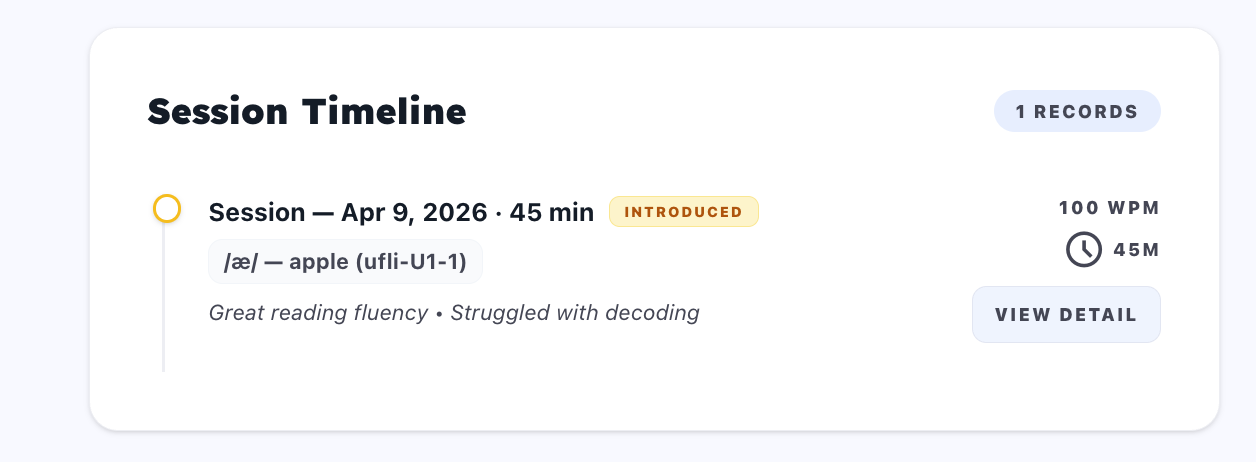
- Open
Session Timelineand clickView Detailfor a record. - In detail modal, review lesson-plan link, error patterns, and metrics.
- Edit session fields when needed (if account has write access).
Result
- Student history stays auditable and usable for planning/report continuity.
UI illustrations
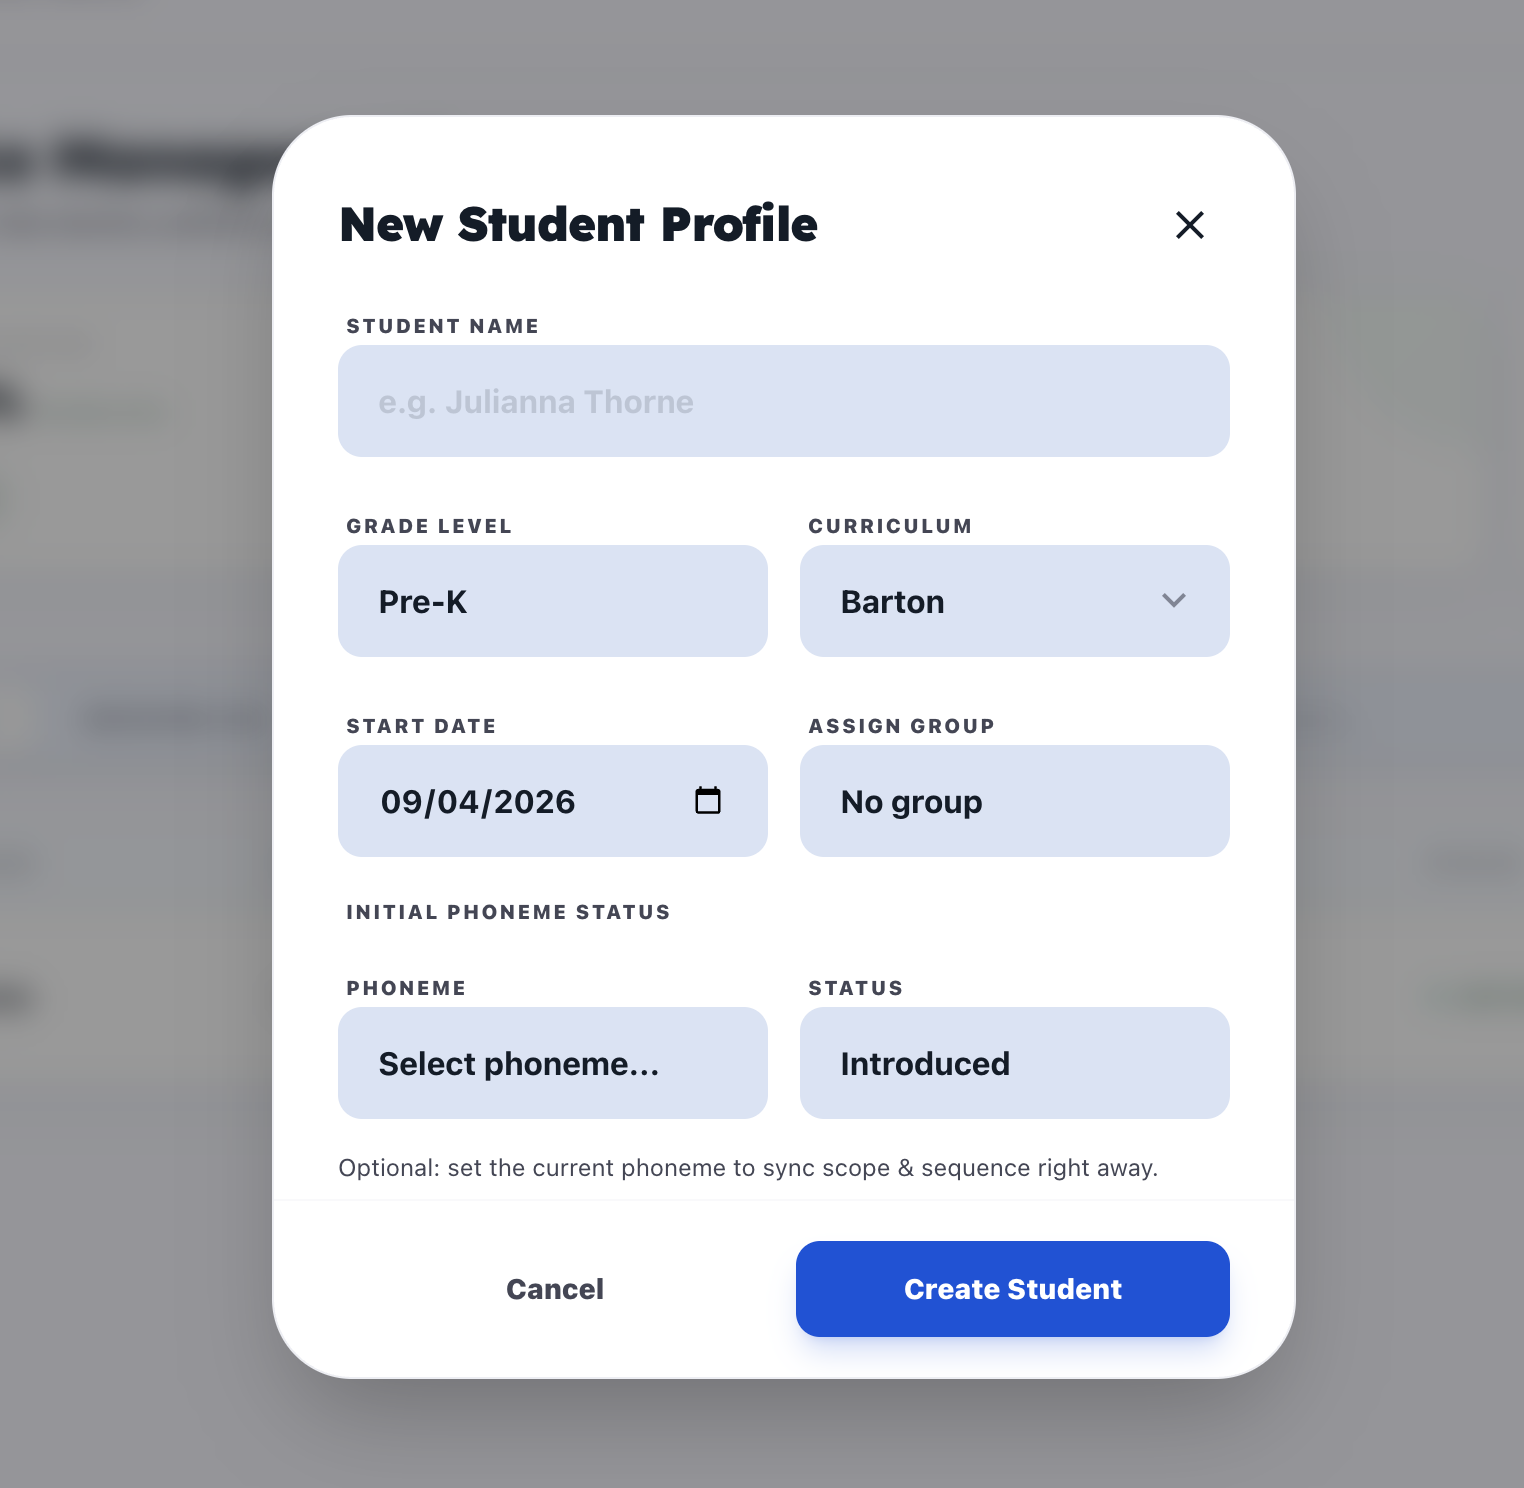
6. Build Lesson Plans Inside Student Detail
What this feature does
- Creates or clones student-scoped plans from the same profile page.
- Defines instructional protocol and assignment-ready activity structure.
- Auto-generates student practice links after save.
How it works on the UI
Entry Point
- On Student Detail header, click
New Lesson PlanorPlan (Clone Last).
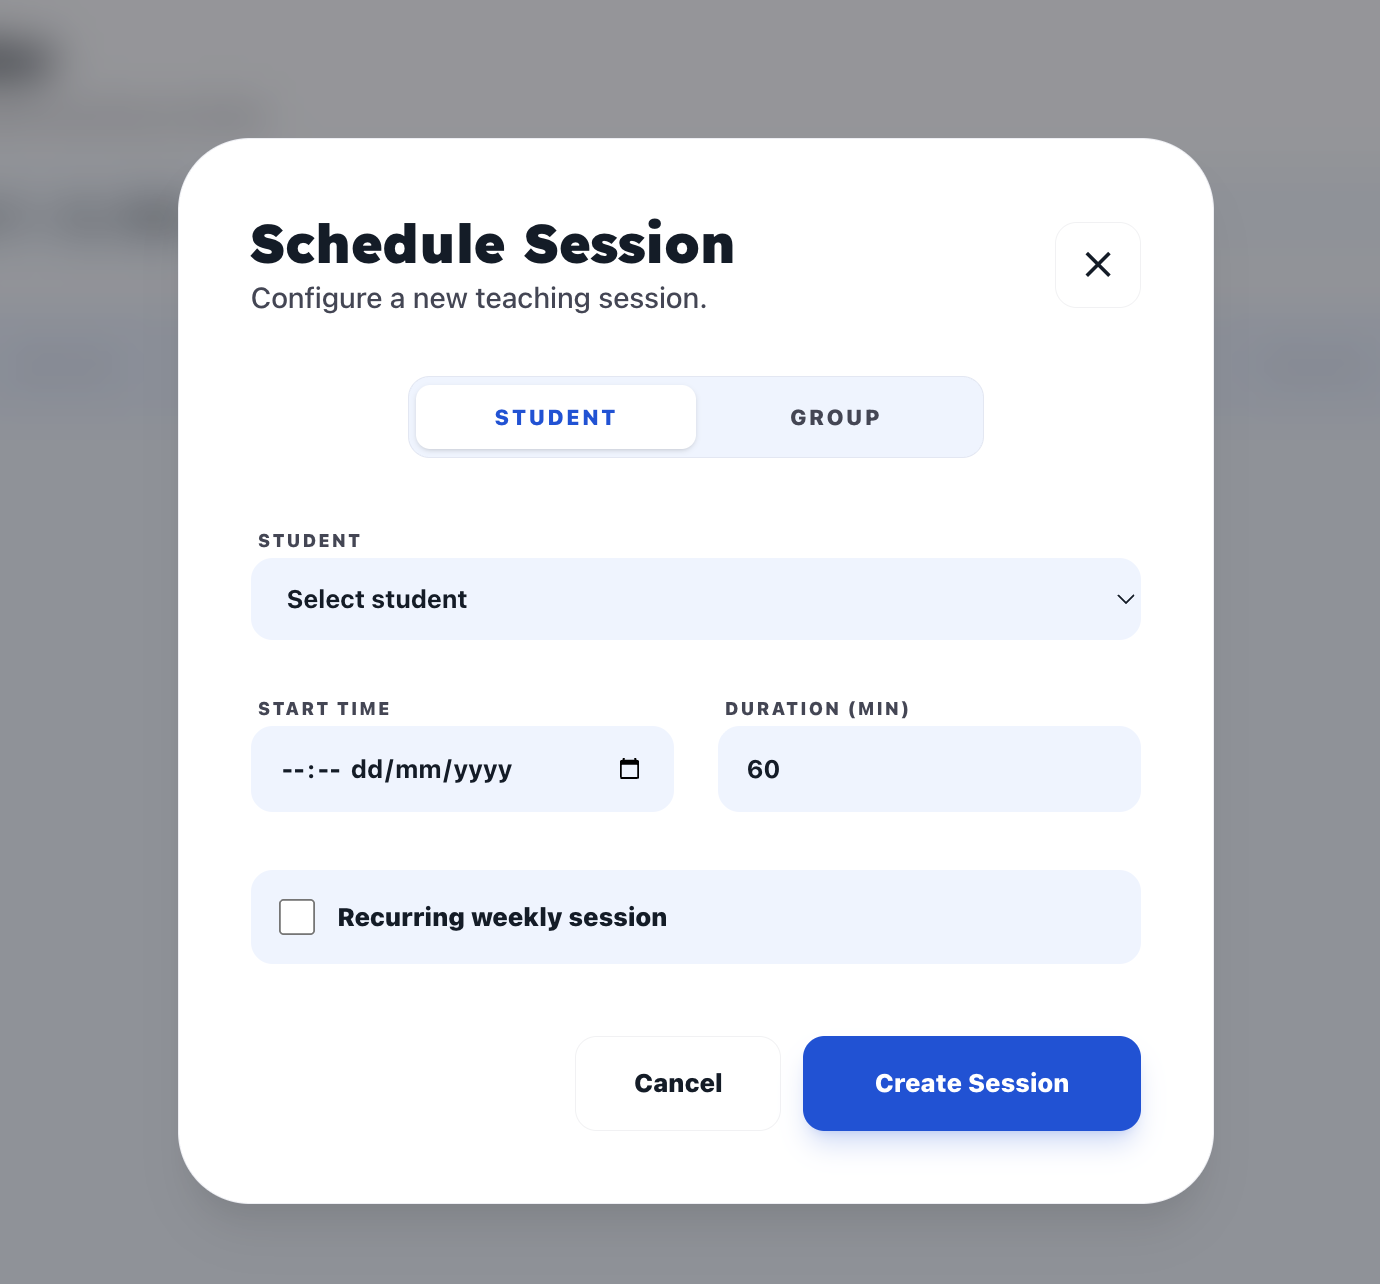
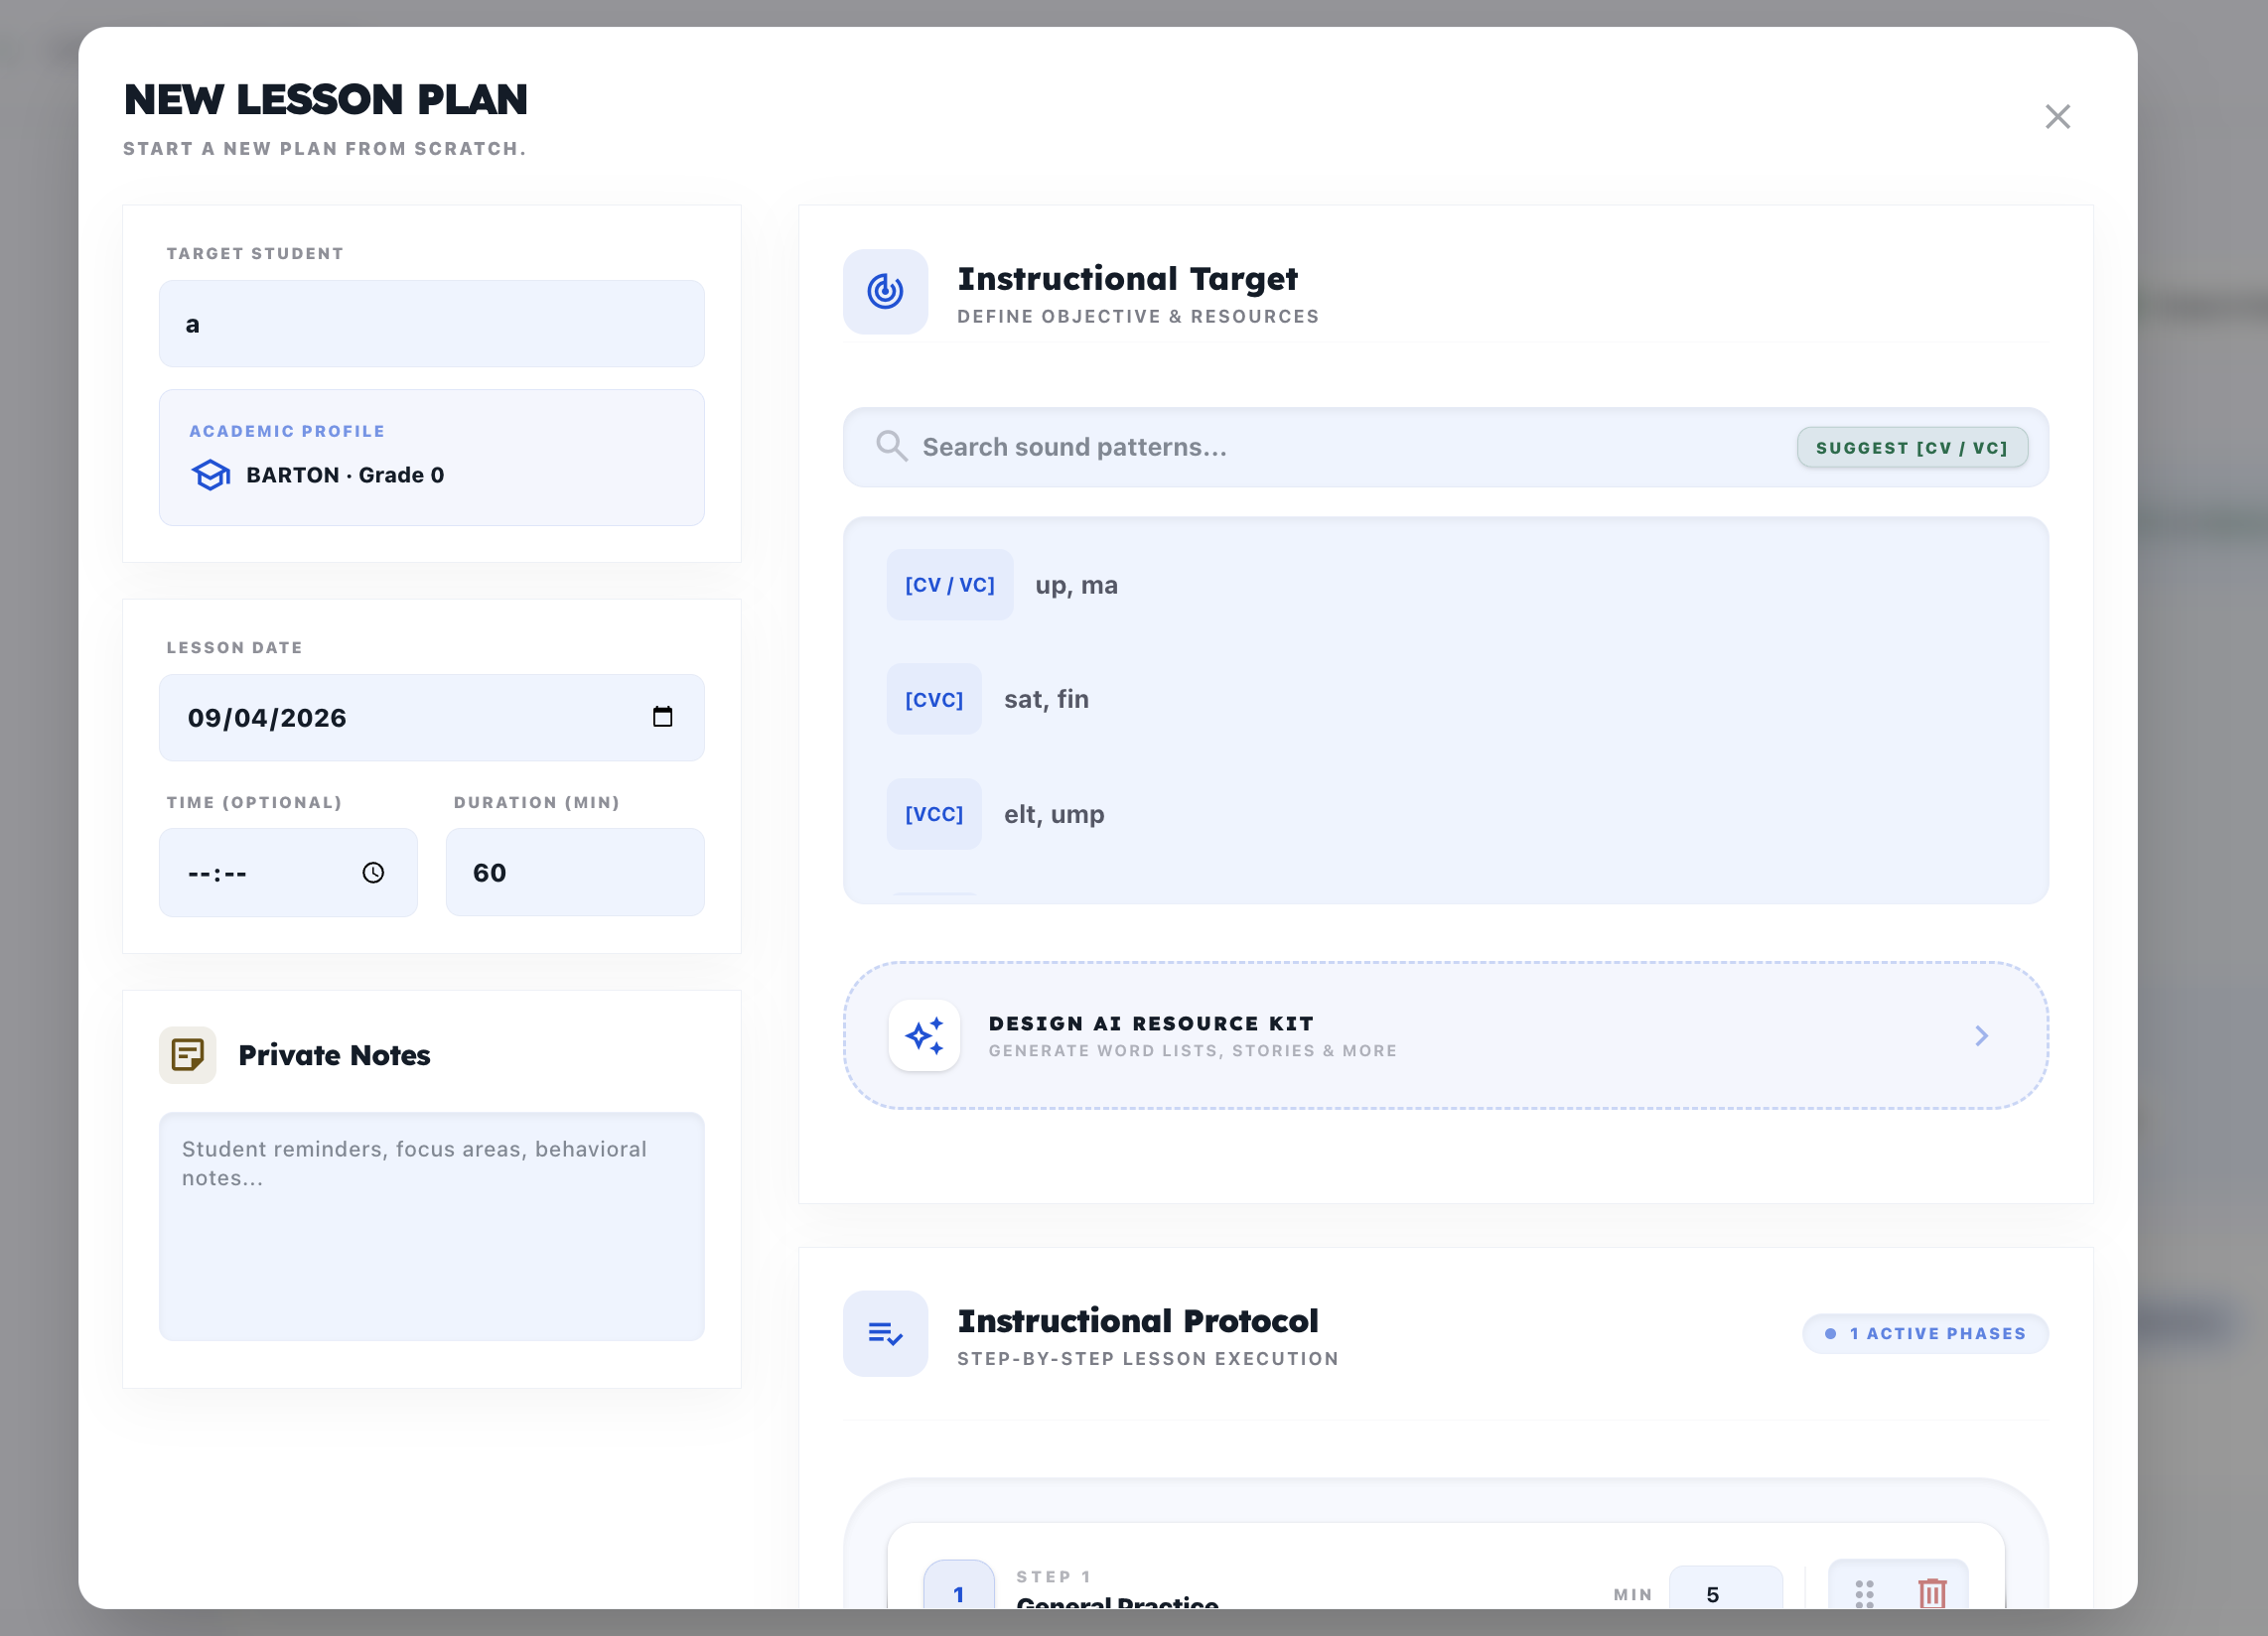
Steps
- Confirm student context and plan date/time.
- Select target phoneme or custom target.
- Add tutor coaching notes and objective context.
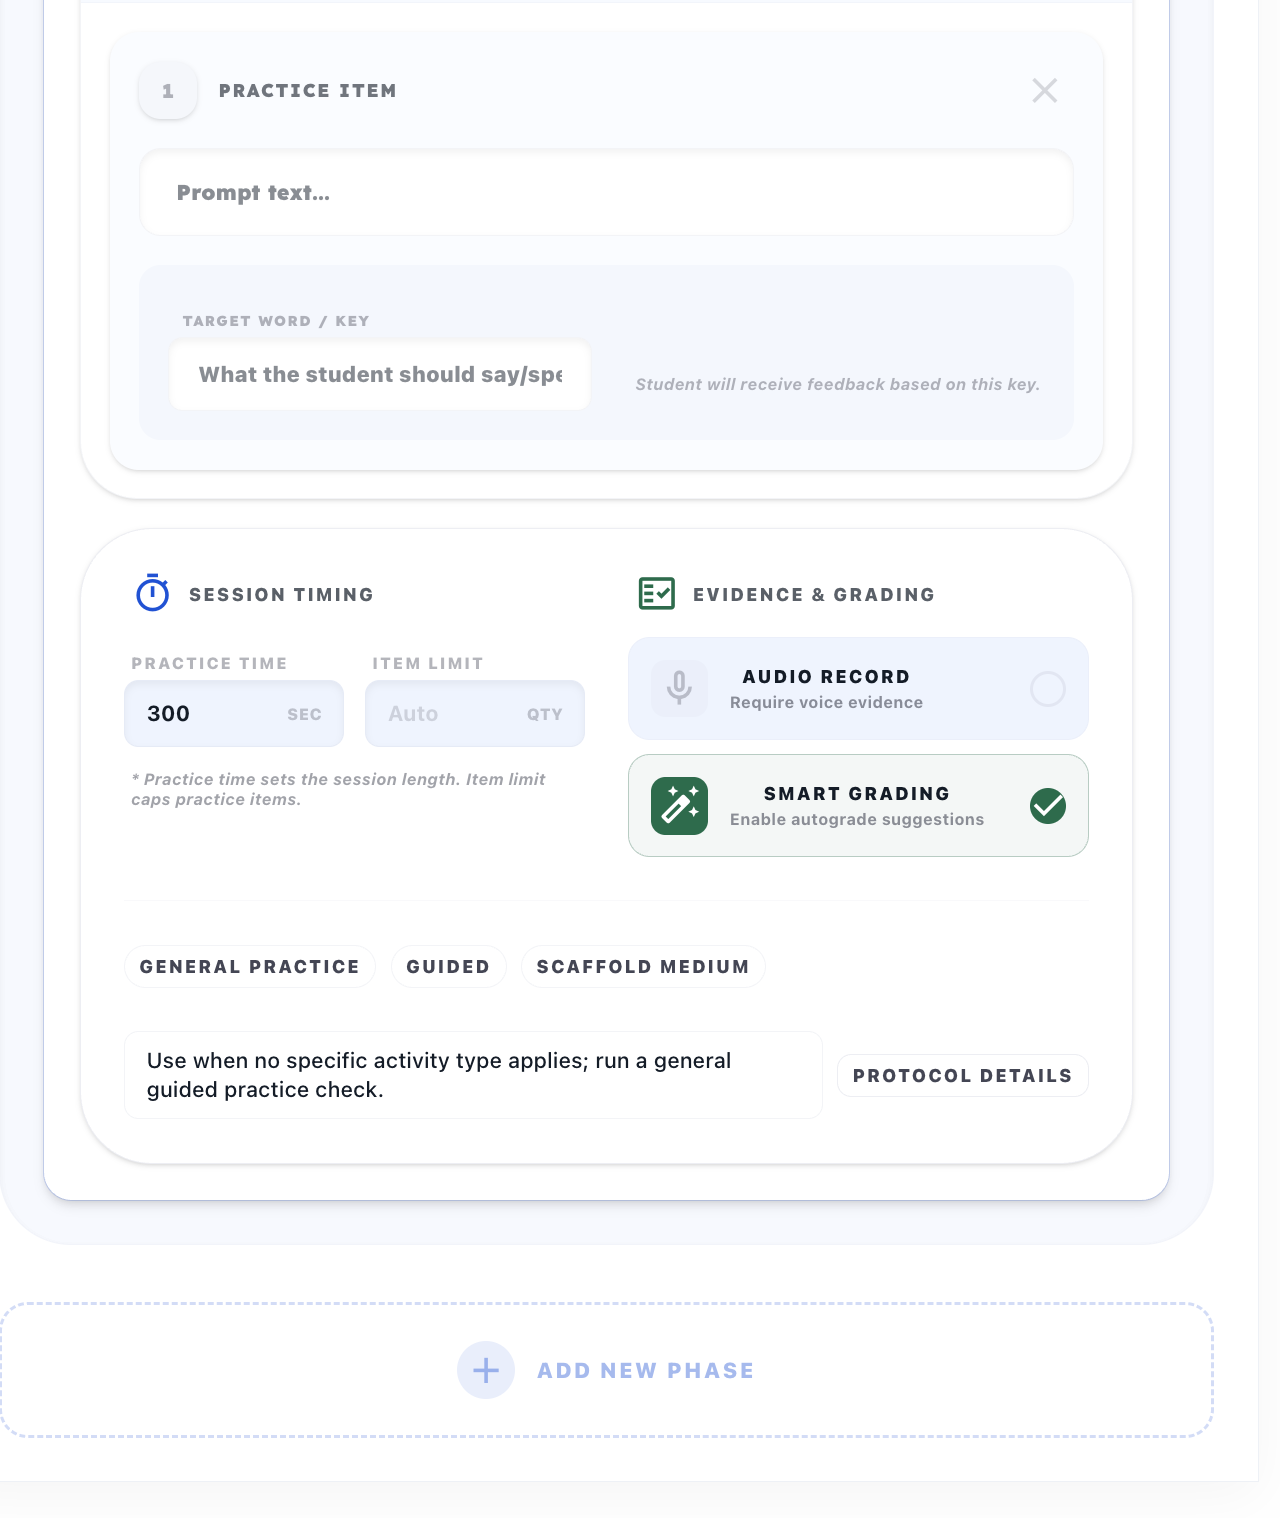
- Build phase list: add phase, reorder phase, remove phase, and set per-phase duration.
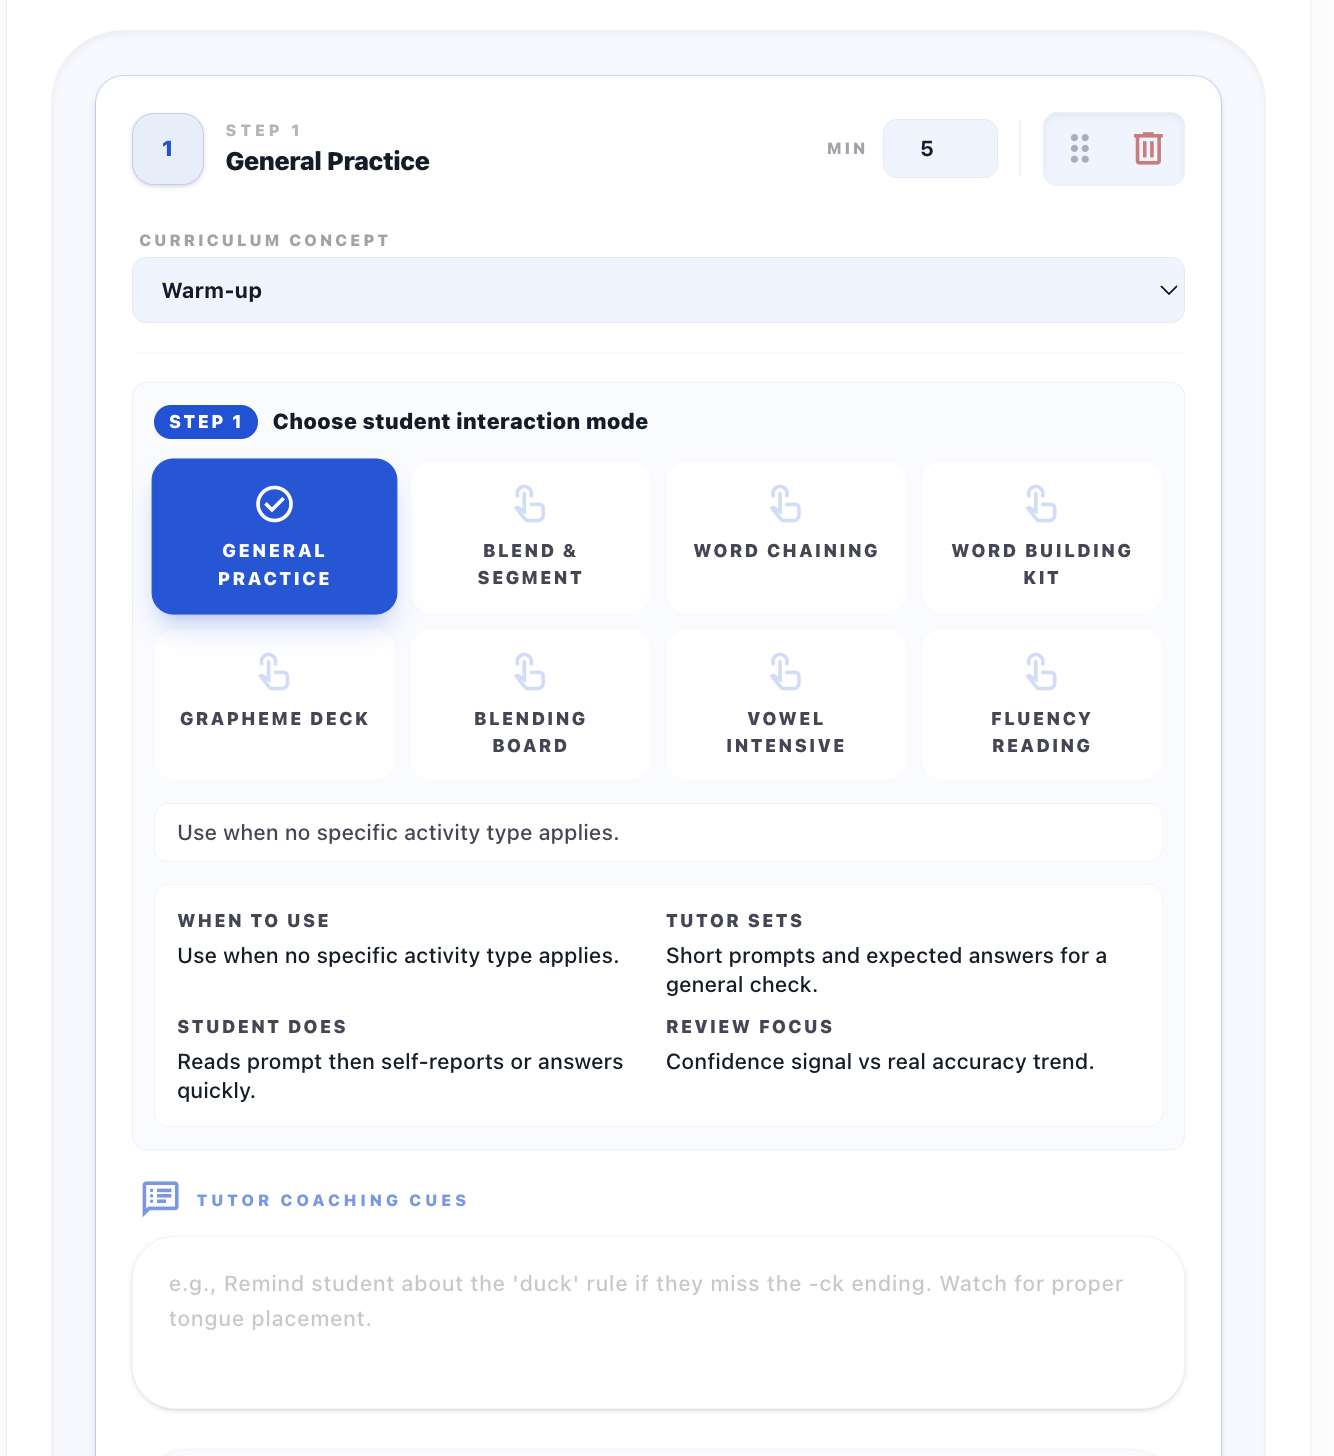
- For each phase, choose
Interaction Modeand define protocol/input behavior. - Configure evidence and grading toggles:
Audio Record,Smart Grading, and optional protocol details (Objective,Error Focus,Rubric). - Save plan with
Save Lesson Plan.
Interaction Modes (8)
| Interaction Mode | Best Use | Student Action |
|---|---|---|
| General Practice | Broad guided check | Quick guided response |
| Blend & Segment | Phoneme order/segmentation | Blend/segment sound sequences |
| Word Chaining | One-change transitions | Complete ordered word chain |
| Word Building Kit | Tile-based spelling | Build words from tile set |
| Grapheme Deck | Fast grapheme discrimination | Pick correct grapheme choice |
| Blending Board | Block/onset-rime blending | Blend left-to-right blocks |
| Vowel Intensive | Vowel contrast training | Identify correct vowel pattern |
| Fluency Reading | Passage fluency work | Read timed passage, submit |
Result
- Plan is saved to history and ready for session start and/or independent practice publishing.
UI illustrations
7. Use Lesson Plan History
What this feature does
- Maintains reusable plan history and action controls per plan state.
- Handles start-session, edit, and existing practice-link reuse.
How it works on the UI
Entry Point
- Scroll to
Lesson Plan Historyin Student Detail.
Steps
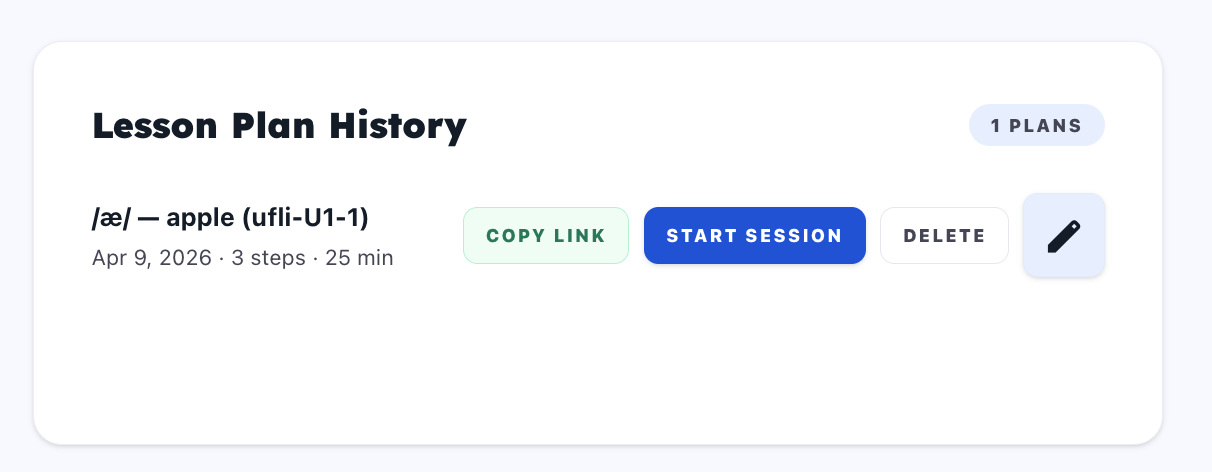
- Review each plan row (target, date, steps, total minutes).
- Use available action by state:
Start Sessionfor valid plans,Loggedbadge for already-used plans,Editor read-only view if locked,Deletewhen allowed, andCopy Linkif a practice link exists. - Keep future-dated plans for scheduling context (not immediate start).
Result
- Tutor can reuse and operate plan lifecycle without leaving the student context.
UI illustration
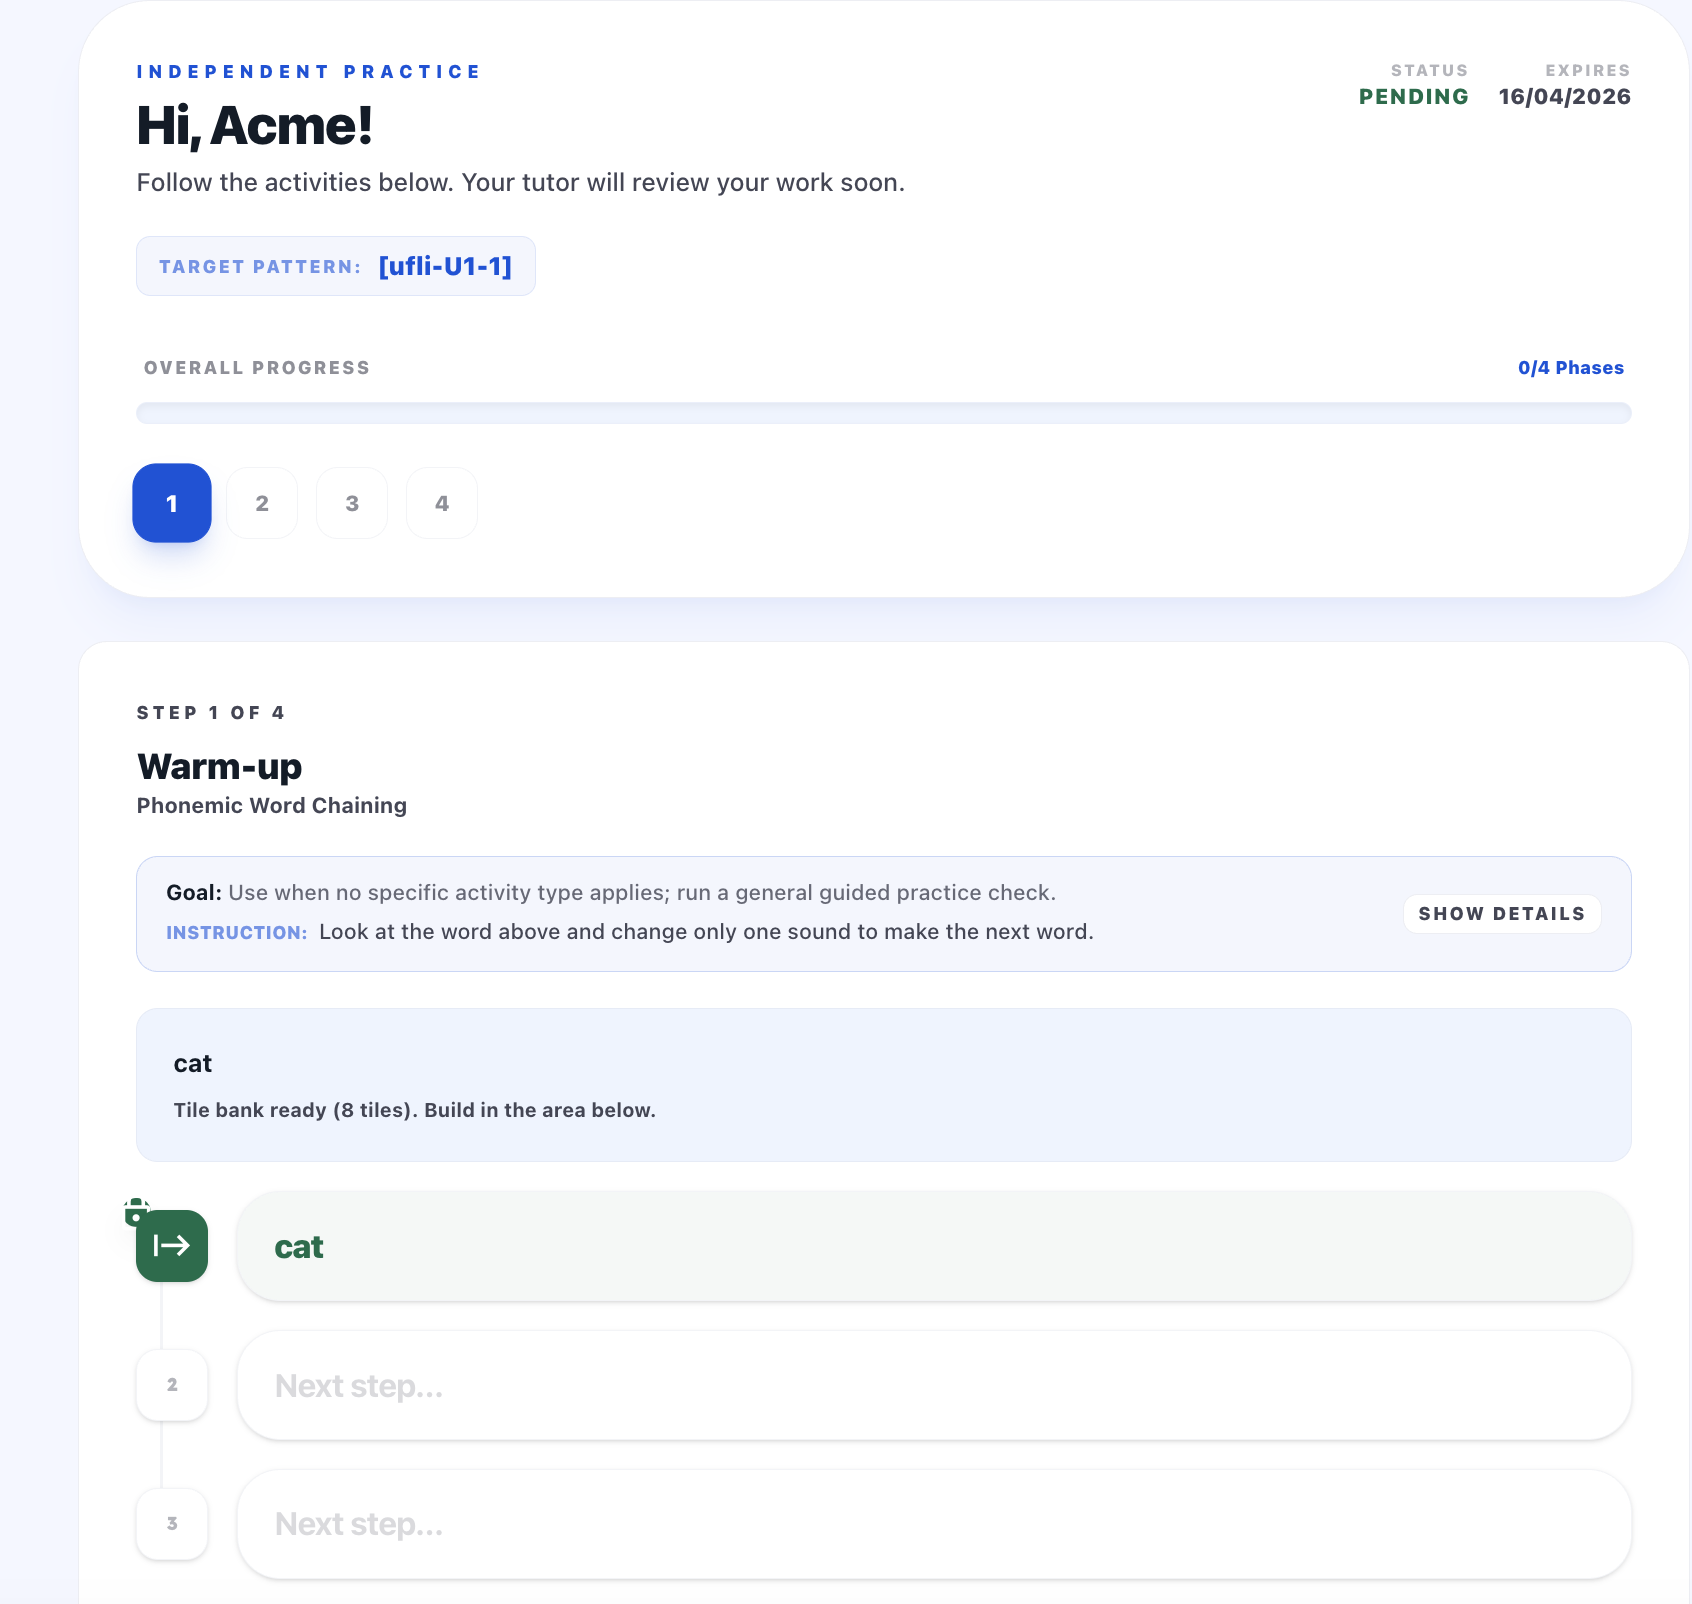
8. Copy Practice Link and Open Student Public Practice
What this feature does
- Publishes a student-facing assignment URL based on selected plan activities.
- Opens a clean public practice interface at
/practice/{token}.
How it works on the UI
Entry Point
- Save a student plan, then use the success bar
Auto-Assigned!->Copy Link, or useCopy Linkin plan history when present.
Steps
- Copy generated link in
/practice/{token}format. - Open link in browser.
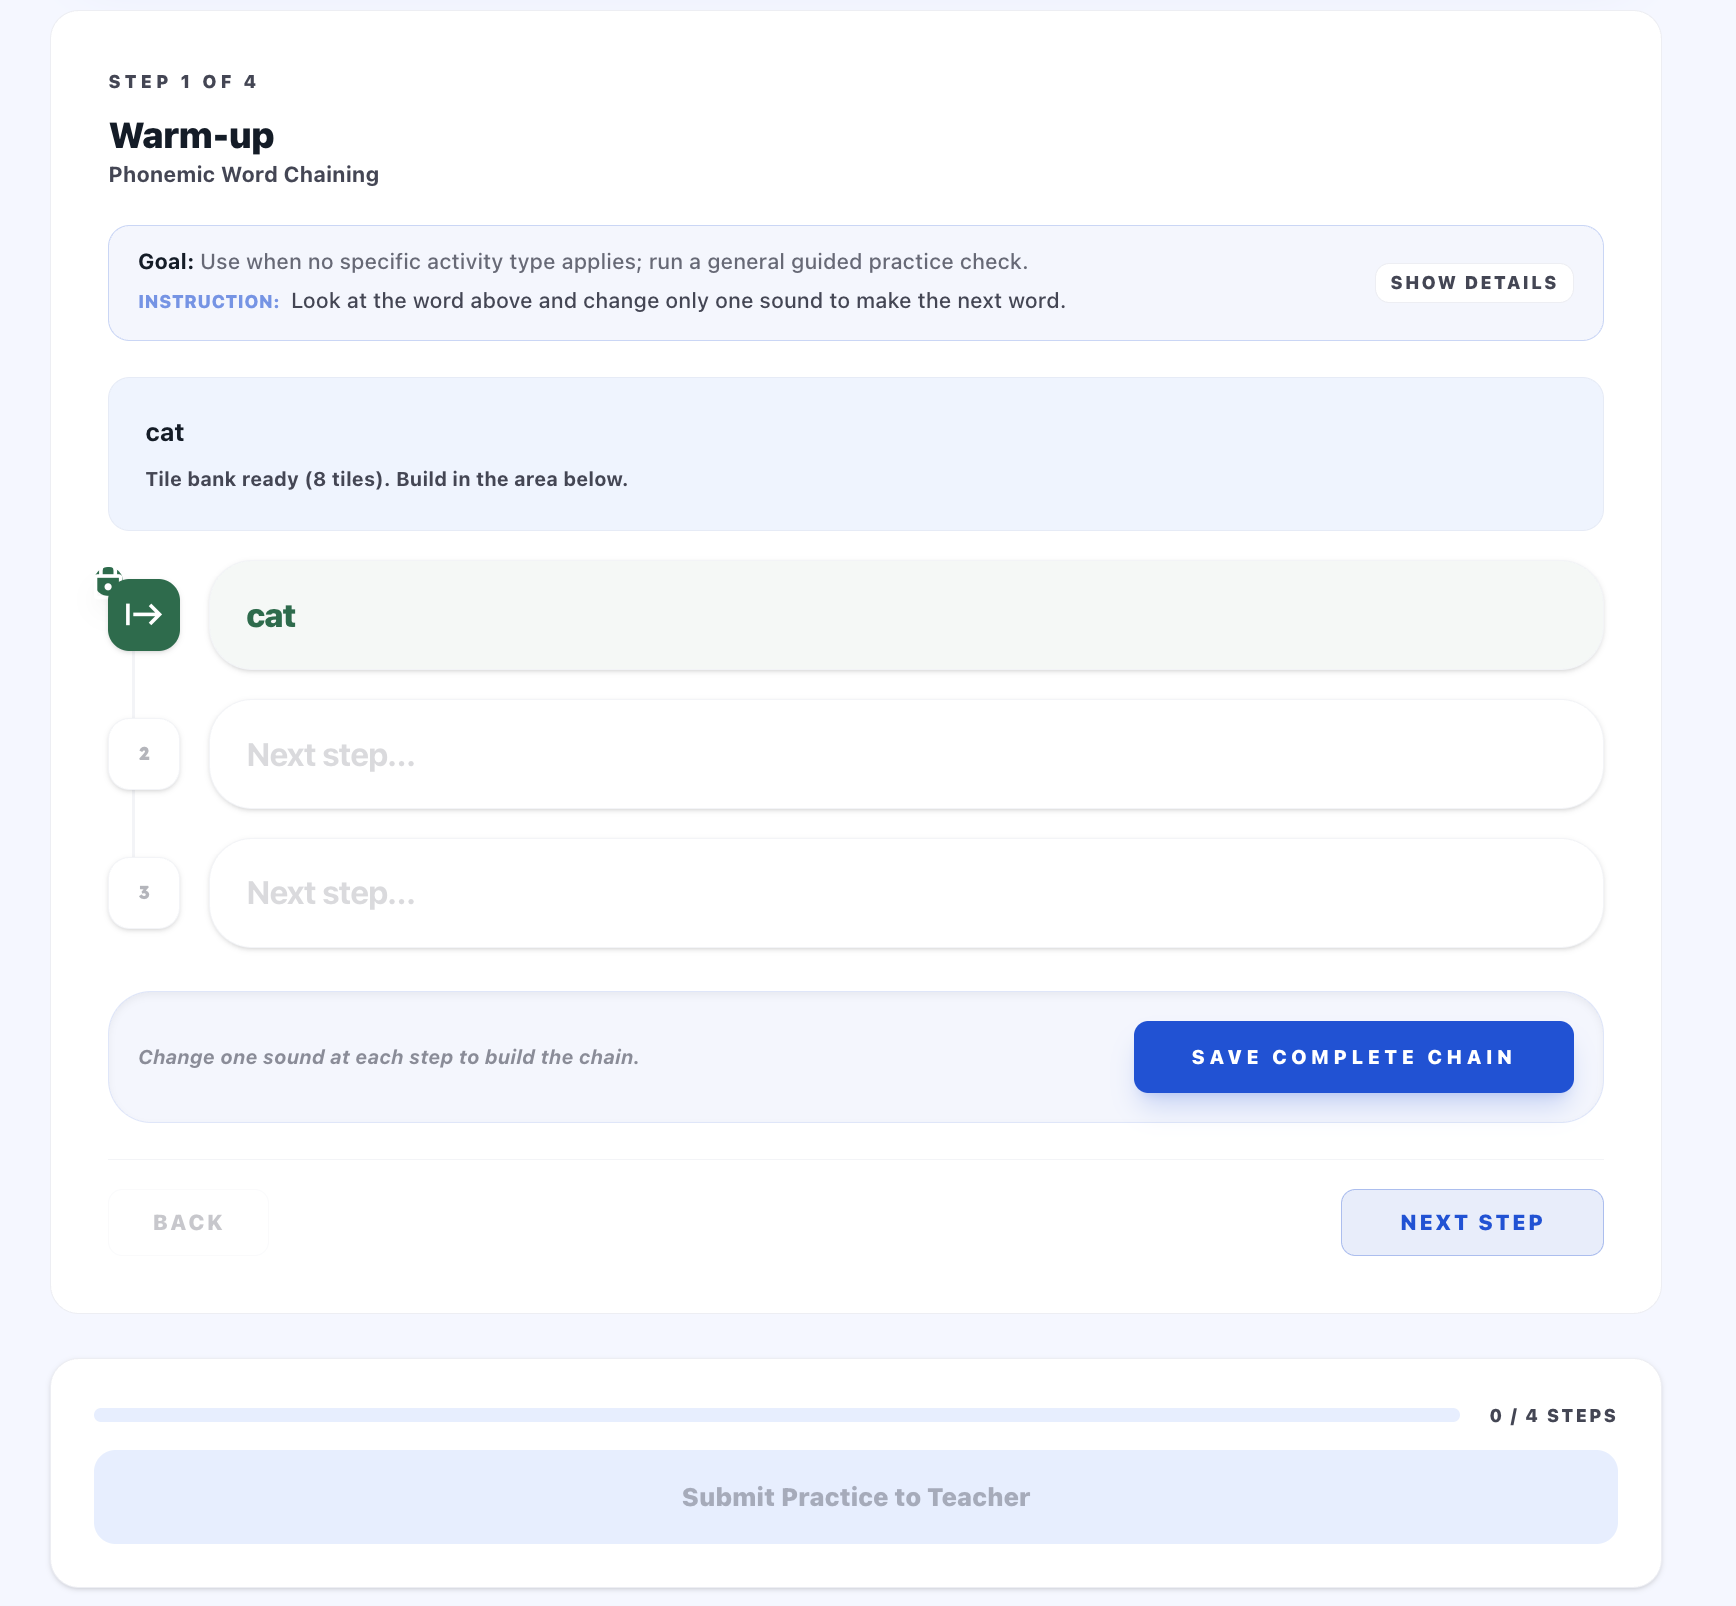
- Student sees assignment status, expiry, and step navigator.
- Student completes prompts by mode: self-report, MCQ, text response, chain response, tile build, and fluency timer/passage.
- If audio is required, student records before final submit.
- Student submits and sees completion state.
Result
- Tutor receives attempt data back in the student practice review queue.
- If link is expired or closed, public page shows blocked message state.
9. Monitor Practice Queue from Student Detail
What this feature does
- Provides queue health at a glance for the current student.
- Helps prioritize what to review first.
How it works on the UI
Entry Point
- Use
Practice Queueblock on Student Detail.
Steps
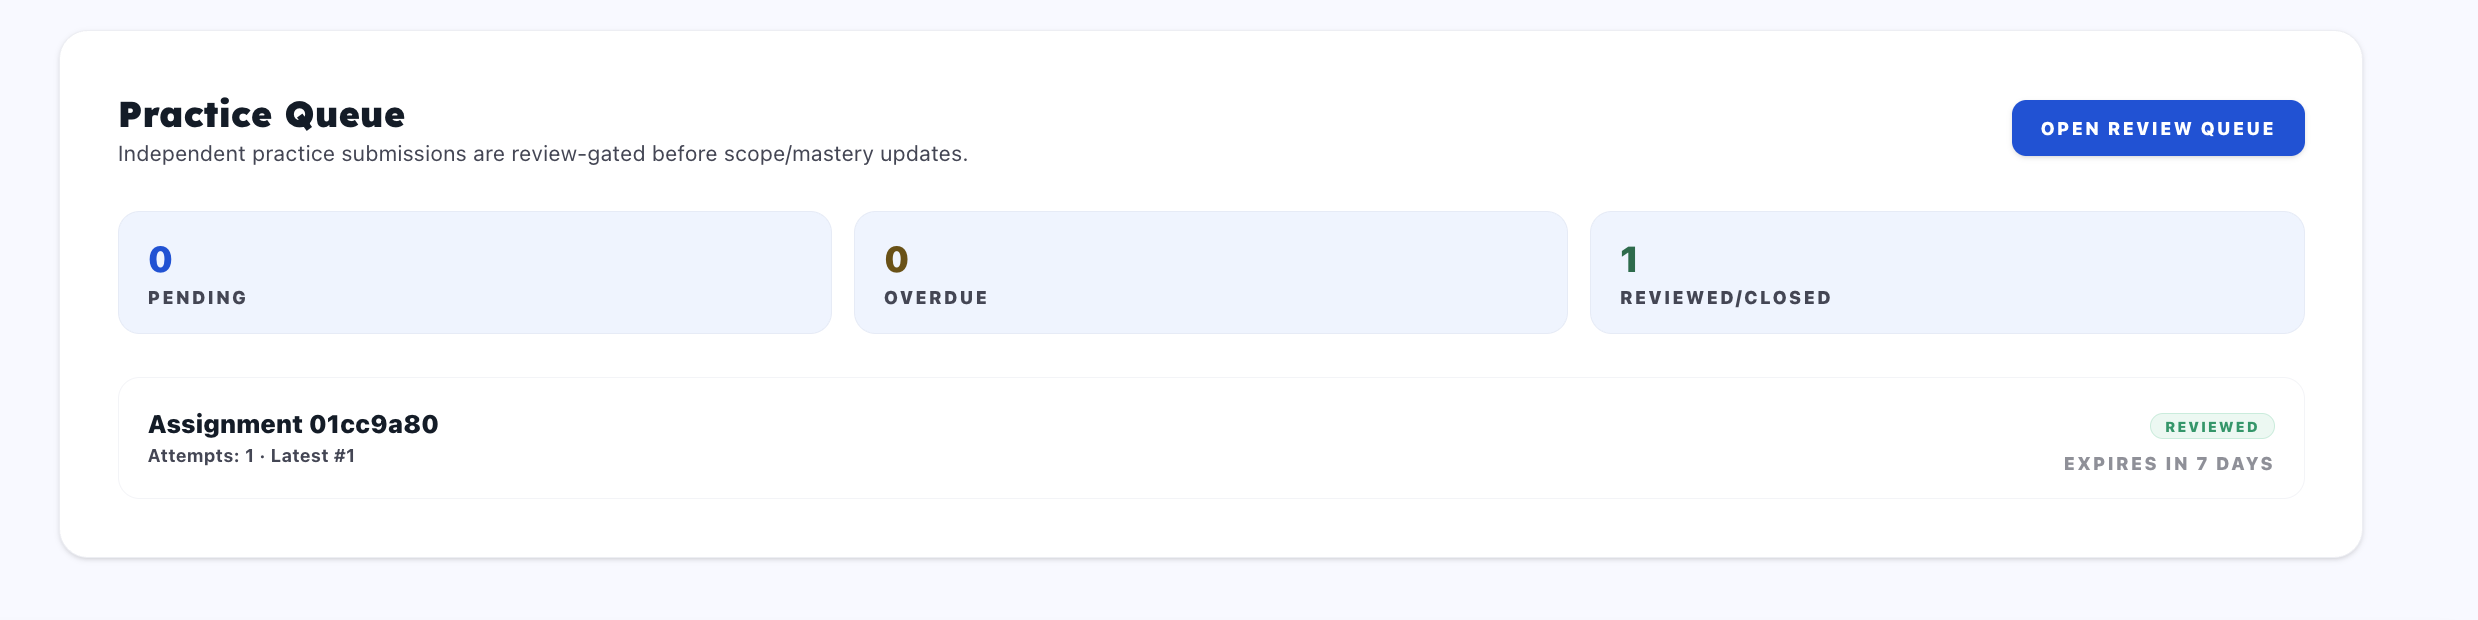
- Read counters:
Pending,Overdue, andReviewed/Closed. - Check recent assignment cards: status, attempts, latest attempt index, and expiry.
- Click
Open Review Queueto go to/students/{studentId}/practice.
Result
- Review backlog is visible without leaving the student page.
UI illustration
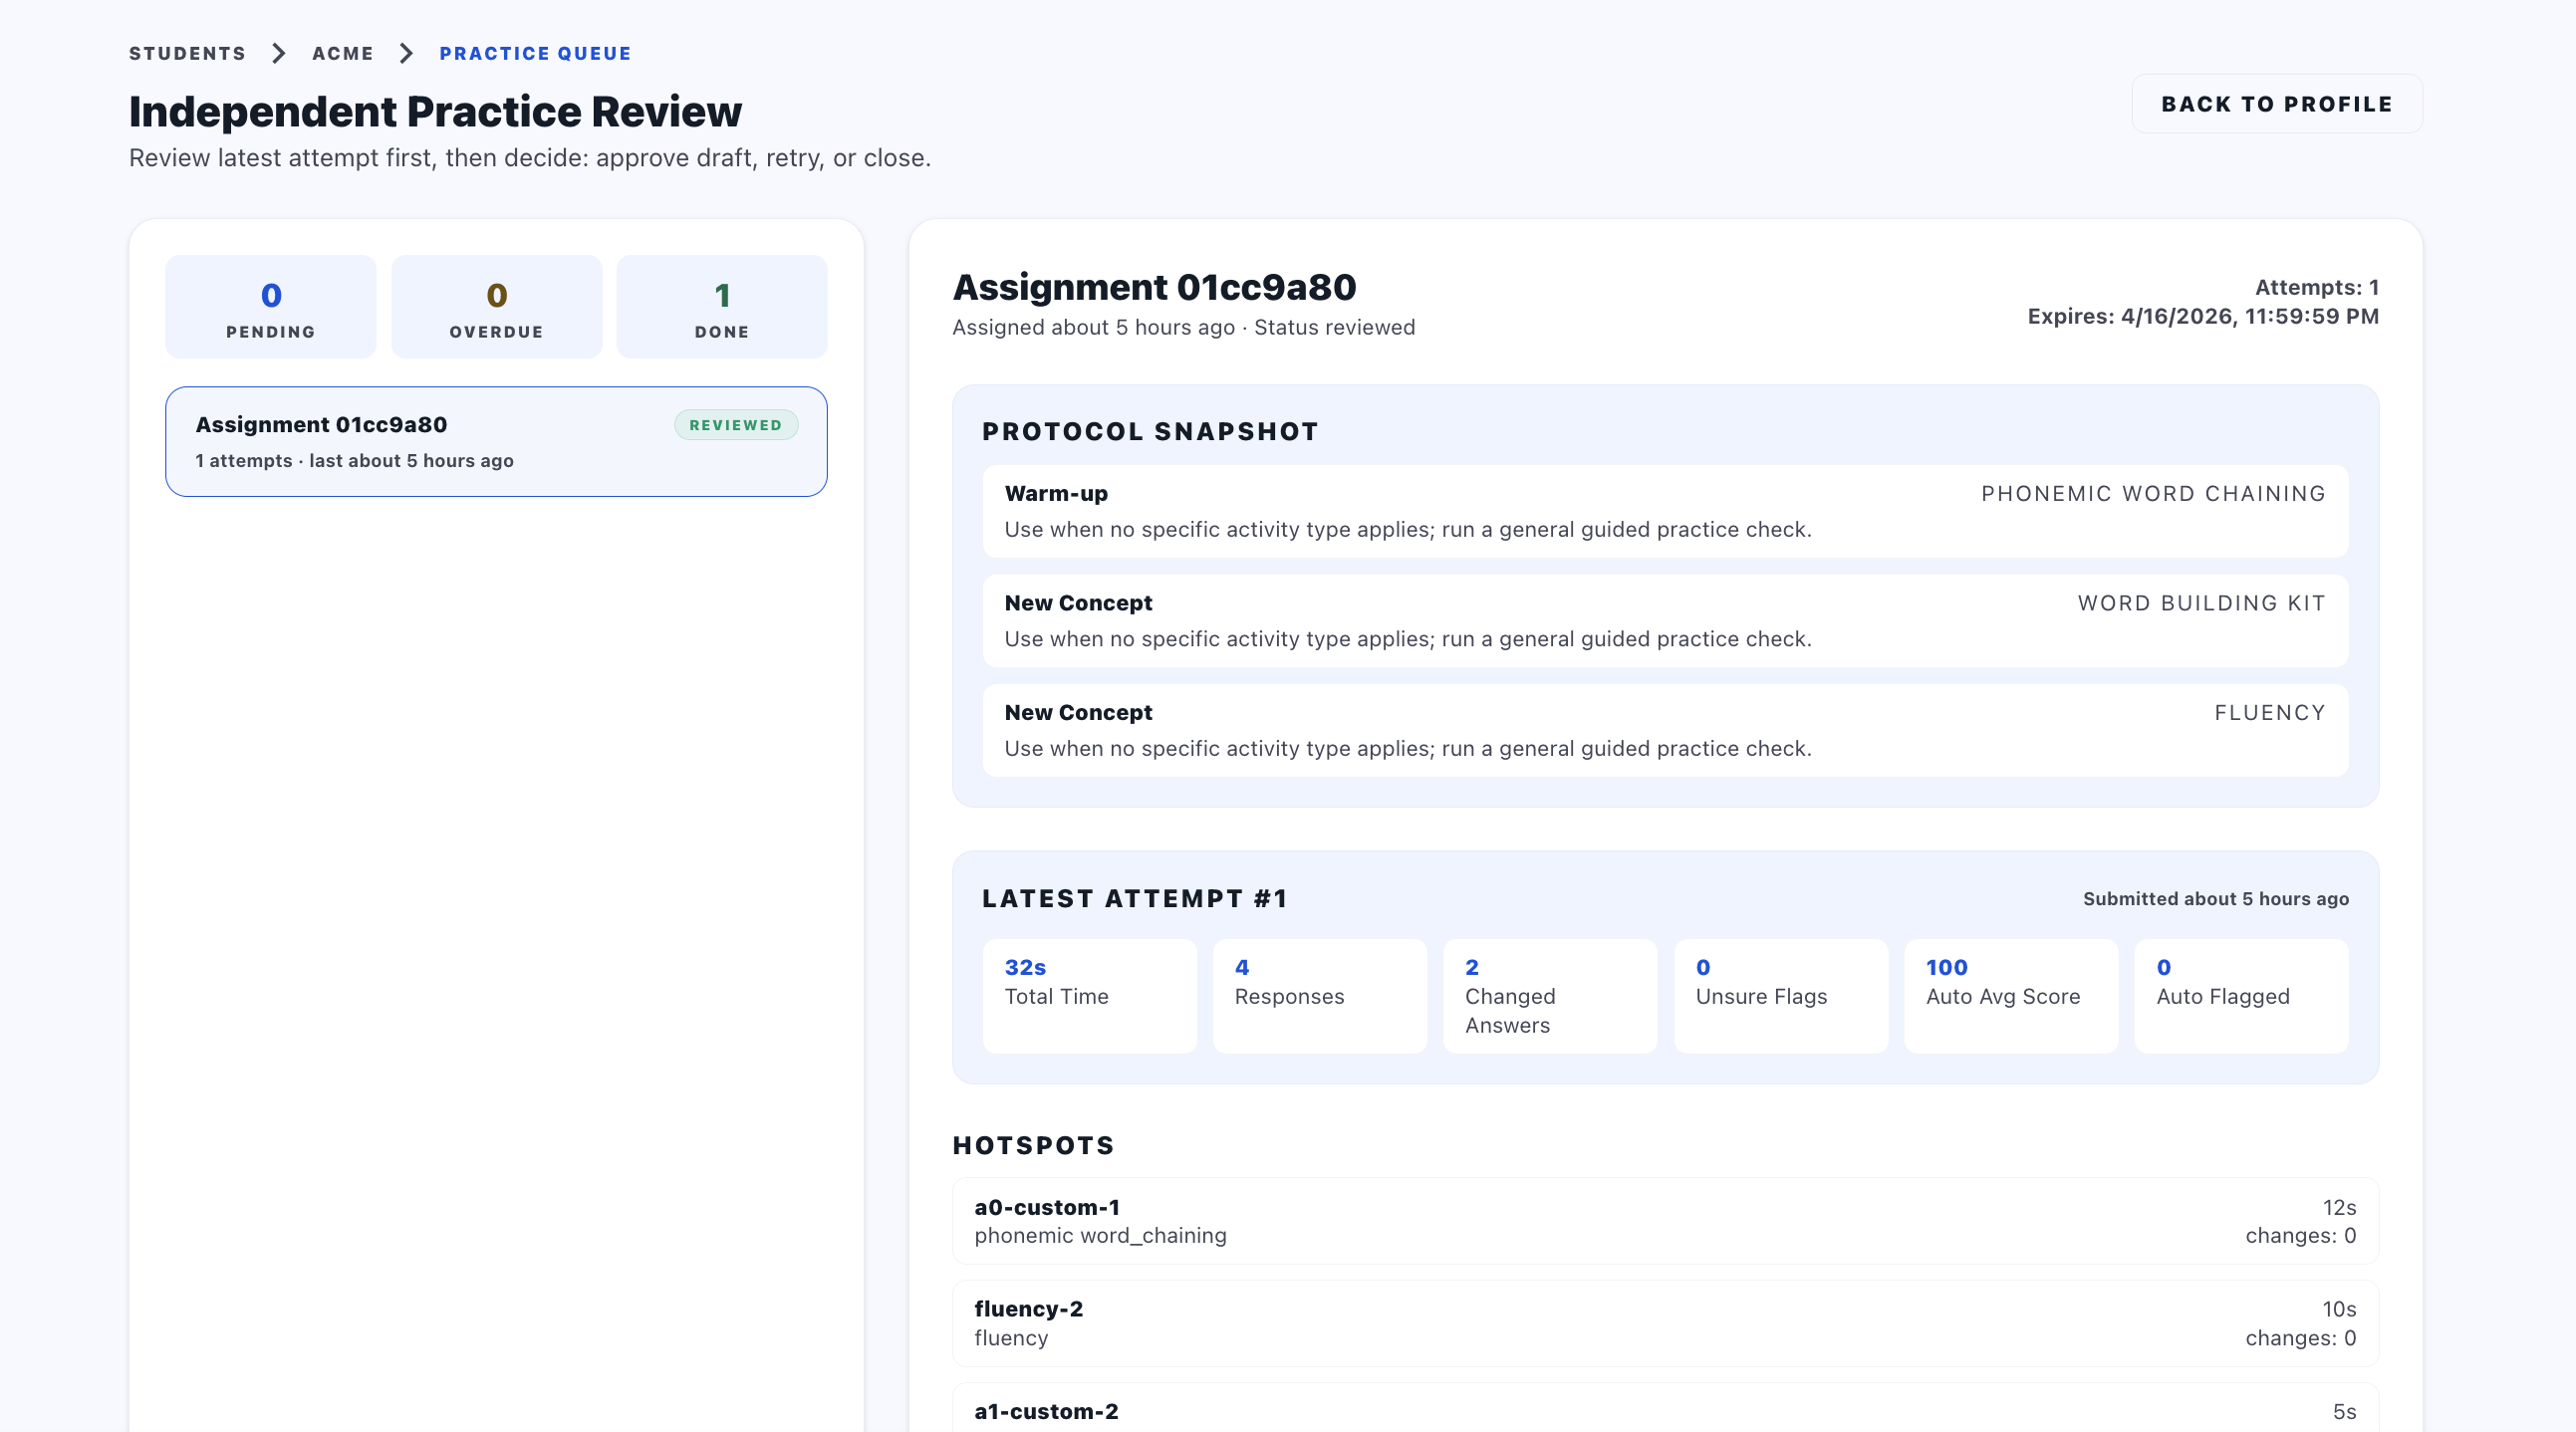
10. Review Independent Practice (Tutor Side)
What this feature does
- Supports detailed grading and final review decisioning per assignment.
- Controls when a session draft can be generated from approved work.
How it works on the UI
Entry Point
- Open
/students/{studentId}/practice, then select an assignment.
Steps
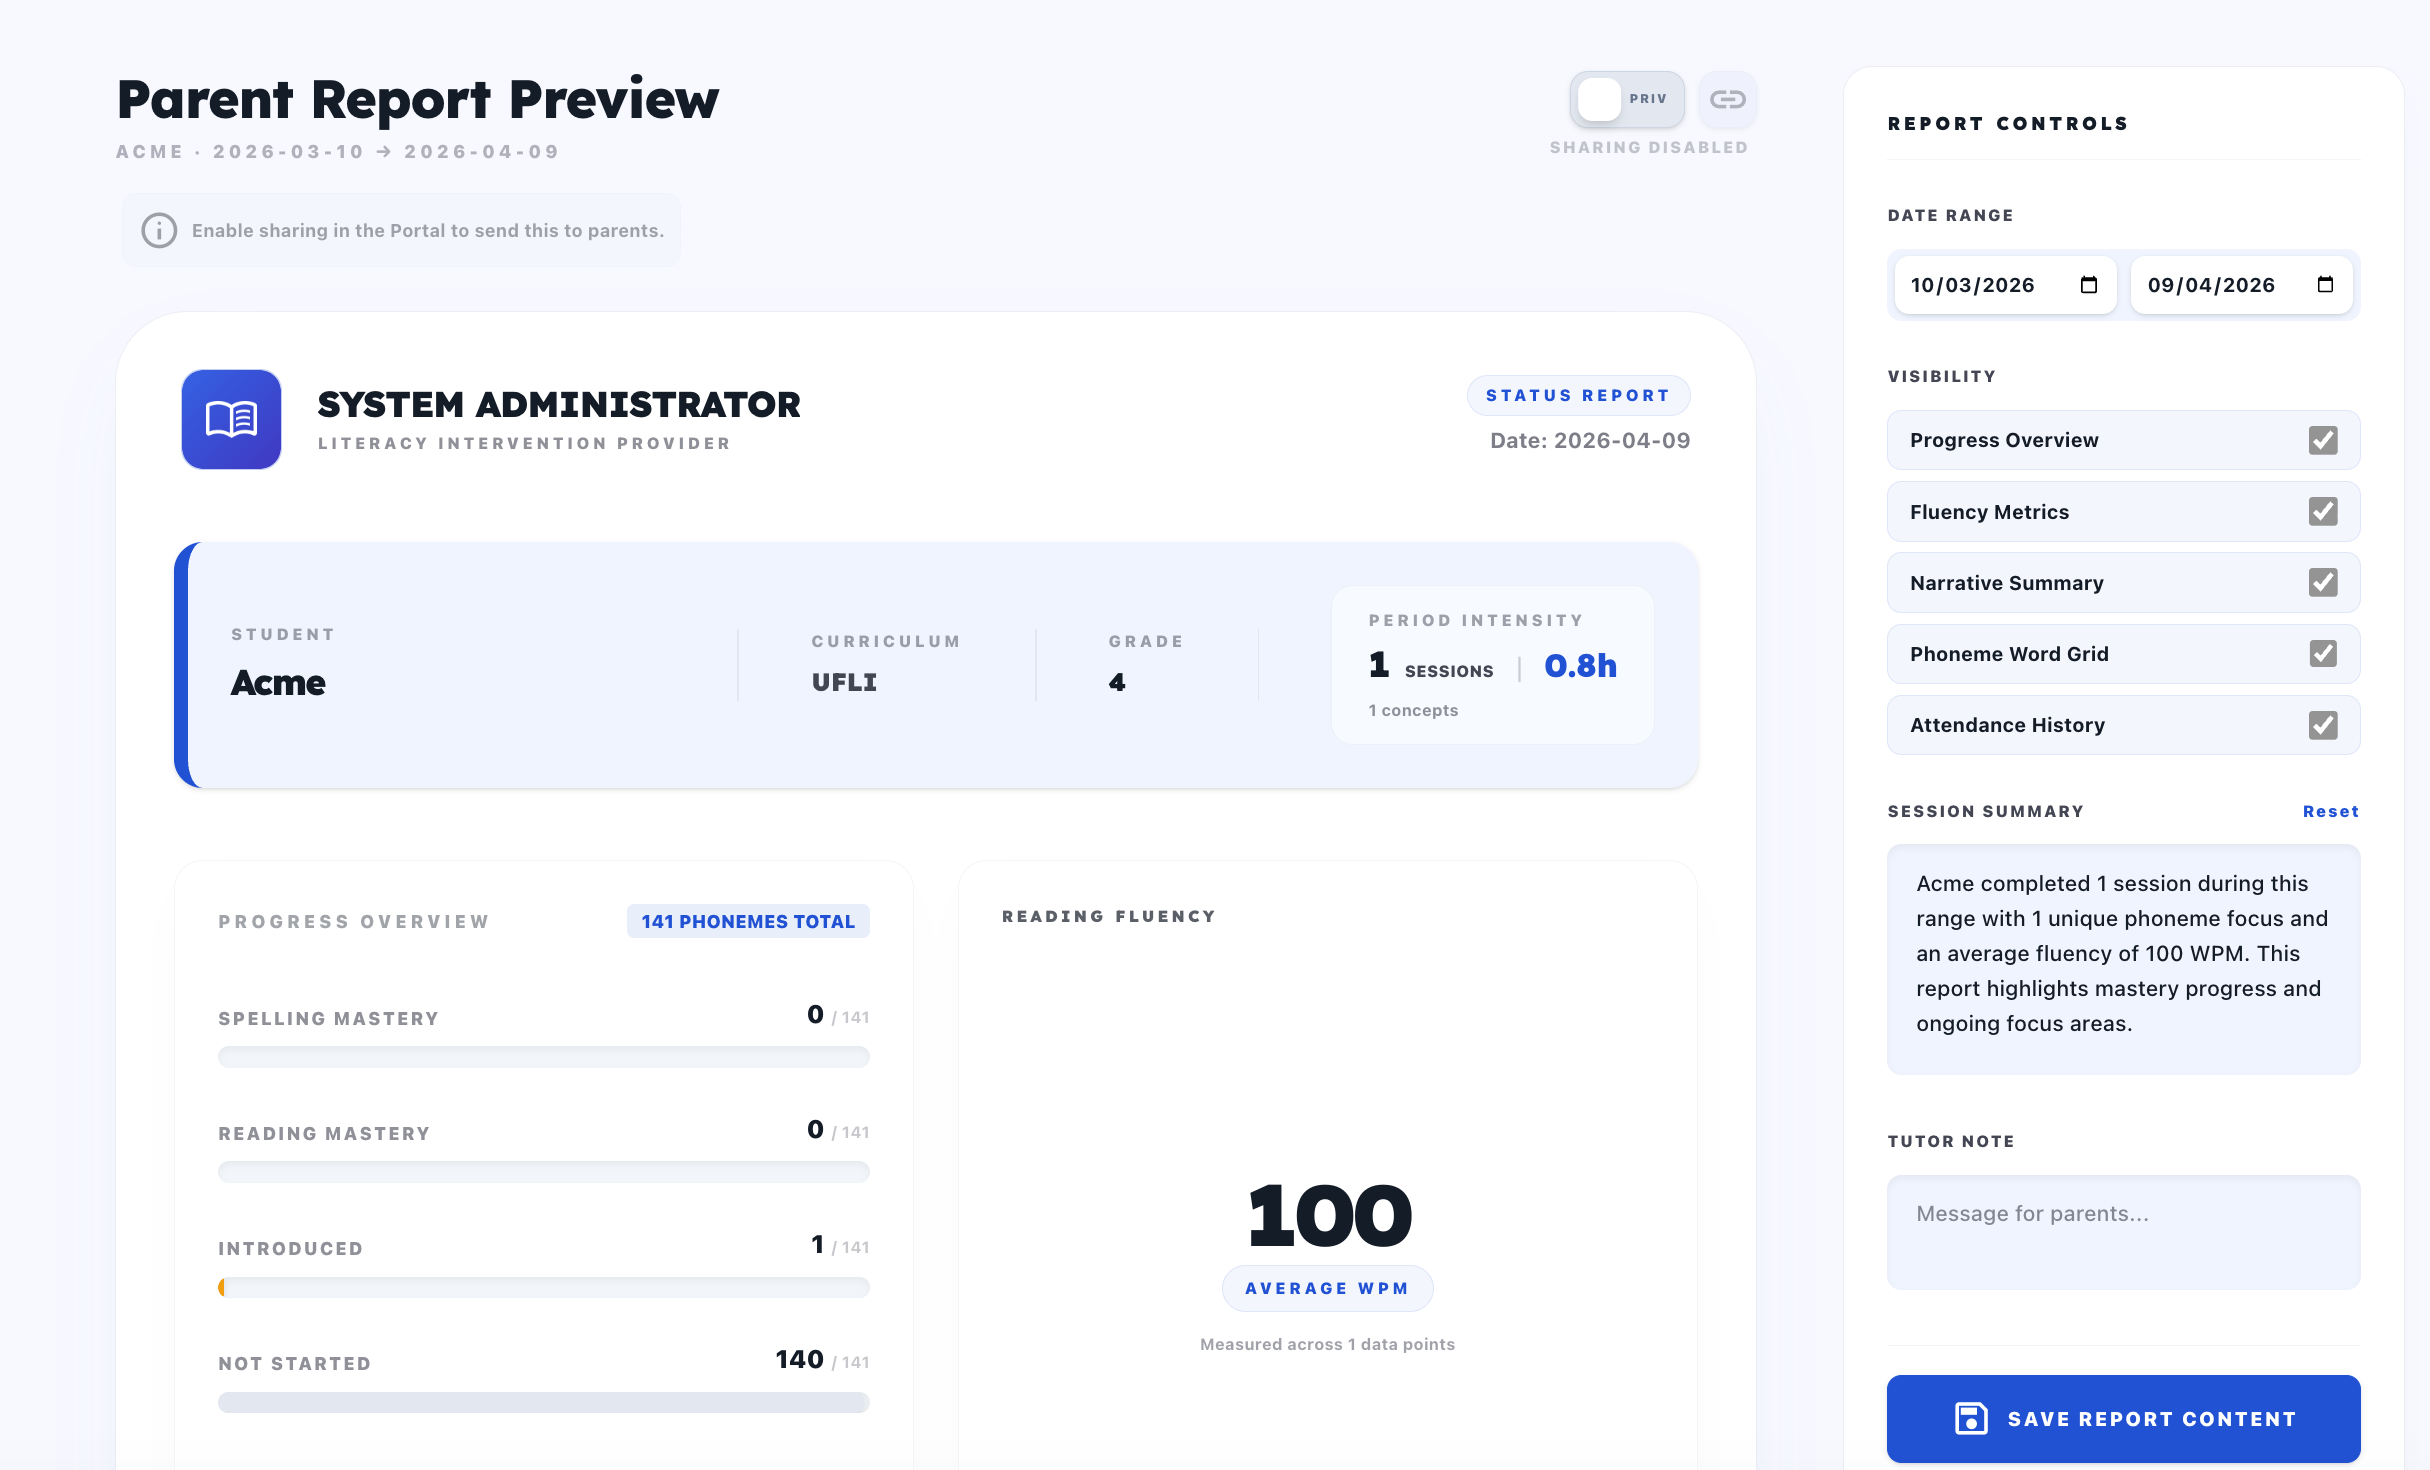
- Review assignment header and queue status.
- Inspect latest attempt summary: total time, responses, changed answers, unsure flags, and autograde indicators.
- Switch
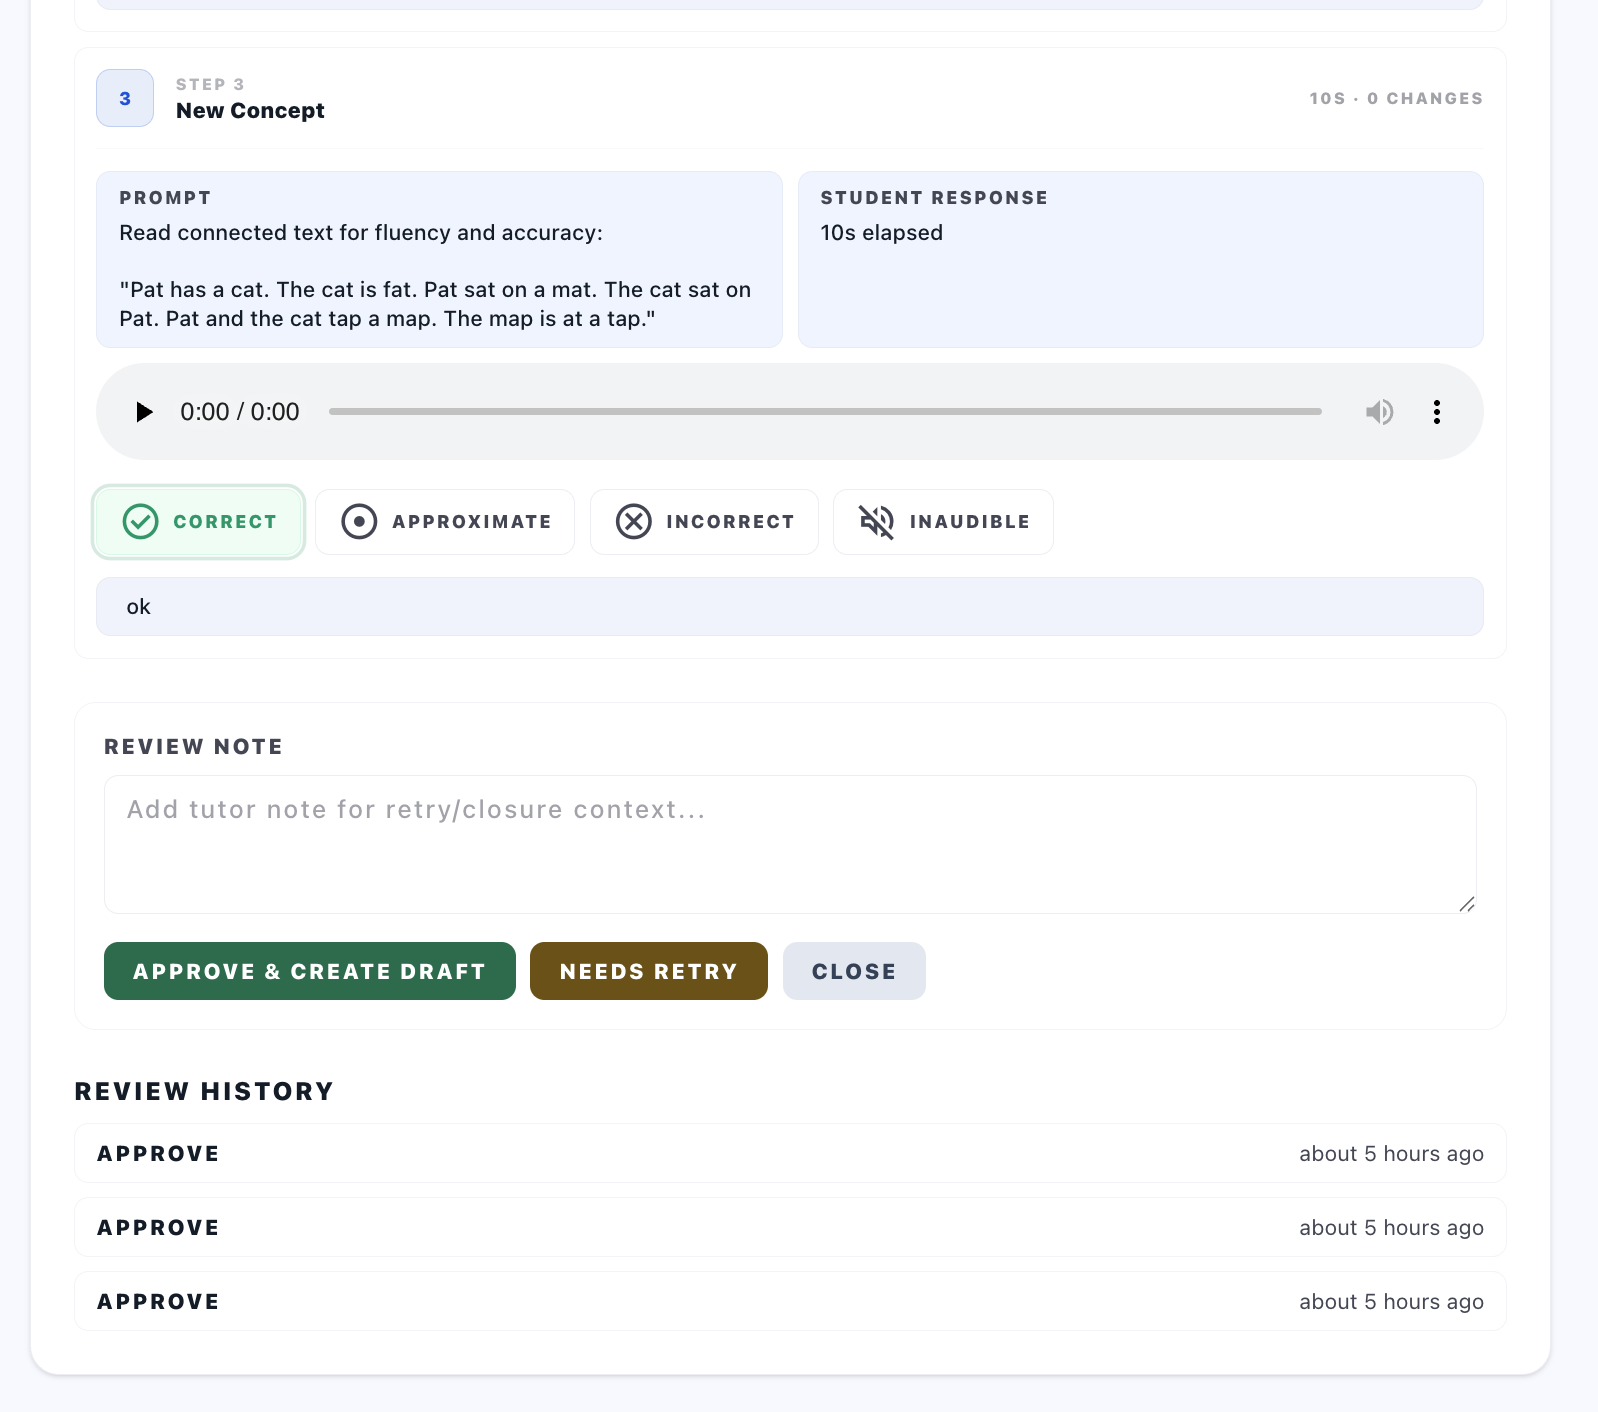
All ItemsvsFlagged. - For each item, review: prompt, student response, expected answer, and audio playback when available.
- Grade items needing manual decision (
correct,approximate,incorrect,inaudible). - Submit final decision:
Approve & Create Draft,Needs Retry, orClose.
Decision behavior
Approve & Create Draftcan be blocked until required audio-grade conditions are satisfied.- Approved flow can redirect into session draft context for logging follow-up.
Result
- Assignment transitions to review outcome and updates Student Detail queue state.
UI illustrations